How to Format a Drive on a Mac
There can be as many reasons why someone would want to format a hard drive on a Mac. Some of us format the drives (internal as well as external) to use it fully again because with time, the supporting files take unnecessary space. There are many theories around “why & how to format a Drive on Mac”, but it can be as simple as just selling your Mac. Isn’t it??
Since formatting any of the drives can be a bit tricky because you may lose your precious data if you don’t have backup. Obviously we can use Disk Utility to format a hard disk, flash drive, or other storage device (easiest to use). So before knowing how to format a drive on a mac, we need to know the file format system to identify the ways to format a hard drive on Mac:
Which File Format You Should Use?
The article is about formatting drives on macOS, however first we should know what we would be using the drive for. So the type of file format will be depending on the purpose of the drive as explained below:
1. APFS (Apple File System)
Since APFS is the new File format system, it’s the default on condition that you’re using the specific macOS version. This newer file system is comparatively more efficient & reliable and on top of that, you can use the case-sensitive or encrypted version as well.
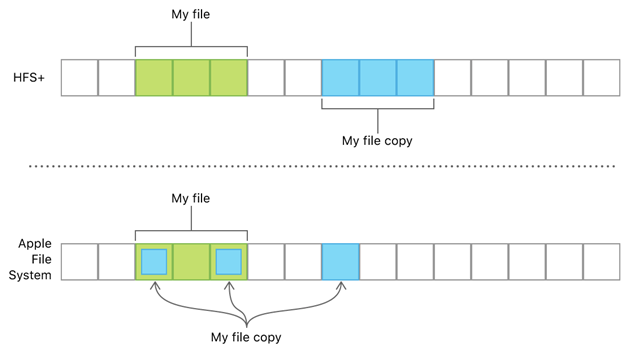
For now, while trying to format a hard drive on a mac, it’s recommended not to use this type of file format system. Because, any Mac that isn’t running on macOS High Sierra won’t be able to read or use the APFS (Apple File System) format.
2. HFS+ or MacOS Extended
Also known as HFS+, MacOS Extended is the prior version of the file format system on the Mac that you could use while formatting the hard drive on Mac. So in simple words, if your Mac isn’t running on High Sierra, the default file format will be MacOS Extended automatically.
From a safety point of view, in case you accidentally lost your drive & don’t want anyone to access the data in the drive, you can use the MacOS Extended (Journaled) version as well. Additionally, you can encrypt & password protect the drive with an extra security layer.
3. FAT32 or MS-DOS FAT
Many of us are quite familiar with this type of file format system as it is fully compatible (read & write) with Mac, Windows, & Linux. Additionally, if you are one of those geeks who like to share & transfer files quite often with your system owning friends or colleagues, this is the best one for you.
However, the catch is the security that can be compromised any time because of being quite an older system without any improvements. On top of that, there are limitations with the file size upto 4GB only so in case you are sharing any movie or high graphics game, don’t go for it.
4. ExFAT
Almost similar to FAT32, however, the only major & only difference is that you can store files with more than 4GB without any hassle. & alike FAT32, you can read the drives both on Windows & Mac if formatted with this method.
5. NTFS
NTFS (New Technology File System) is another file format system that’s the default for Windows OS. & Mac can only read NTFS format, not write anything to it. Obviously, like other problems, there are 3rd party tools that can help you with these situations. Now that we have a bit knowledge about the file format system, let’s proceed to format the hard drive on Mac OS.
How to Format a Drive on a Mac
Not that much complicated but yeah, a few additional steps are there while trying to find how to format a drive on a Mac instead of Windows OS. The file format system plays a quite important role here while erasing everything from the drive. Let’s check it out with the help of below steps.
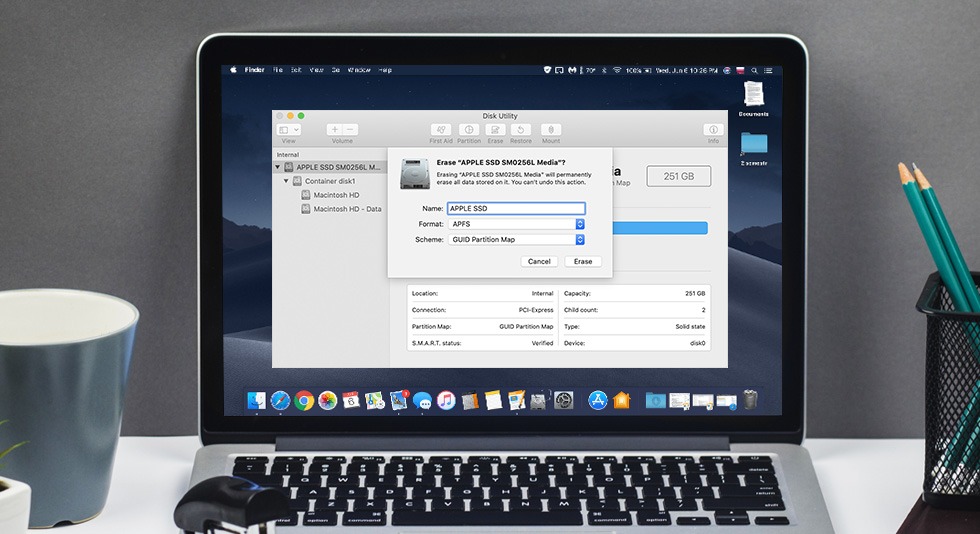
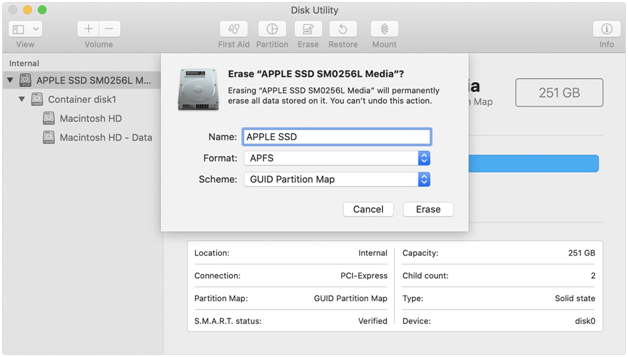
1. Open Disk Utility (the already inbuilt tool on Mac for helping erase the drive data) on your system.
2. Once you open the Disk Utility tool, on the left side of the panel, you will find the drives in different categories (internal, external, & Disk images).
3. Here, you will need to select the drive you’d want to format. However, please know that formatting the drive will clean out all the data the drive holds so don’t forget to back it up first.
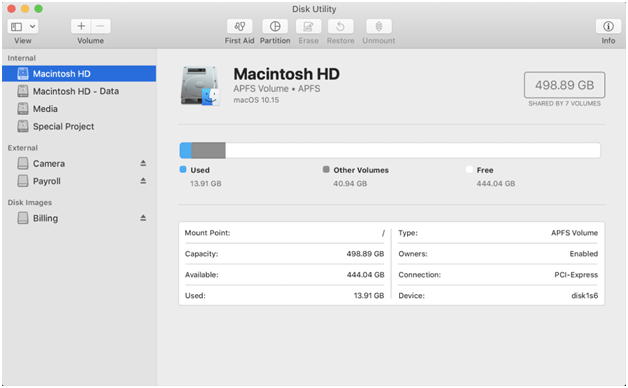
4. Now, among the 5 options (header; on the top of the window), tap on Erase (don’t forget to select the drive first).
5. Since Disk Utility is an advanced tool, it will automatically choose the file format system for you. (Mostly it will be between APFS or MacOS Extended, depending on if you’re using the High Sierra version or an older one).
Please note in case you want to choose some other file format system, choose from the drop-down menu. Your selection will solely depend on the purpose you want to use the formatted drive.
6. On the following step, give the to-be-formatted-drive a name that you can easily remember what data it holds.
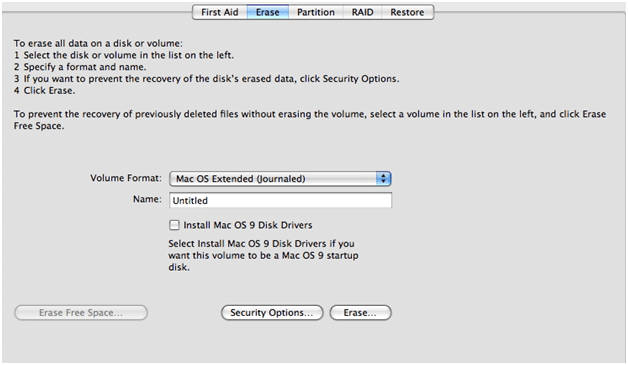
7. After assigning a name to the drive, tap on to the Security option that will ask you to choose the formatting type among many from fastest one to the most secured one.
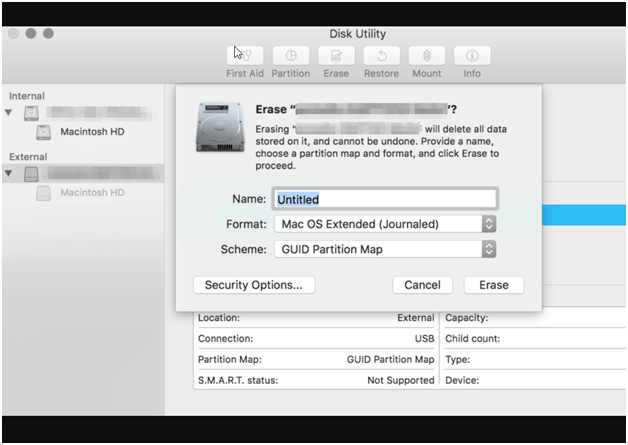
8. We all know, while formatting any drive, the quickest or fastest option doesn’t actually clear out everything on the drive. So if we opt in the option of formatting the drive slowly but most securely, it will be as clean as you may have expected.
9. So, choose out the option that works best for you & tap on Erase to format drive on Mac OS.
10. Let the process continue as it will display a progress bar with the statistics about time it will take & other details as well.
11. Once the process gets completed, you have got yourself the formatted drive as clean as you chose to.
The above process will let you format drive on Mac without worrying much or any discrepancies. The same way, in case you are looking forward to formatting the external drives on your Mac, the process is not identical but the same to an extent.
For example, if you are trying to format a USB drive on Mac, the very first thing you must do is, plugin the external drive.
Let the system find the USB drive, once it does, follow the above steps exactly the same & format USB drive on Mac in a few clicks & minutes as well (depending on the data it holds).
Make sure you take proper backup of the data before formatting the external drive to save yourself from finding out best Data Recovery software later on.
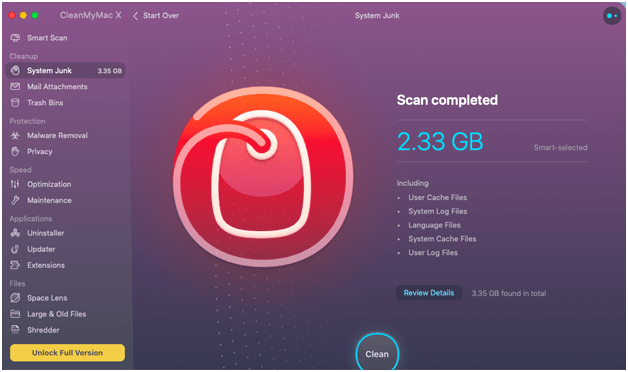
Pro Tip
Keep your disks clean and tidy so that no junk, malware or privacy issues interrupt your flow of work. For the same, the best thing to do is download CleanMyMac X in the system which could remove unwanted files, email attachments and protect your system from malware attack.
Wrapping Up
How to format a drive on Mac isn’t as complicated as it sounds. I agree there are a few additional steps but once you get a hold on those, the process will be a piece of cake for you. Explore Disk utility first, backup the drive you want to format, & then start using the above steps to format the hard drive on your Mac. Simple as that!!
 Best Browser For Mac in 2024: Fastest & Lightest
 Best App Uninstaller For Mac In 2024
 10 Best Duplicate Photo Finder For Mac 2024
 Best Mac Hard Drive Clone Software In 2024
 10 Best Mac Temperature Monitor Apps In 2024