How to Fix Google Chrome so Slow on Mac | Speed Up Your Mac Browsing

Have you ever wondered why Chrome is so slow on Mac? Well, if you’re a Mac user and have been experiencing sluggish performance with Google Chrome, you’re not alone. Many users have reported that Chrome is slow on their Mac, particularly when dealing with multiple tabs, loading heavy websites, or resource-intensive applications. Fortunately, there are several steps you can take to troubleshoot and resolve this issue.
In this article, we’ll explore various methods to fix Chrome running slow on Mac and improve your overall browsing experience.
Understanding Why Chrome is So Slow on Mac
Before delving into the solutions, it’s essential to understand the potential reasons behind Chrome’s poor performance on your Mac. Here are some common causes:
- Limited System Resources: Chrome is a resource-hungry browser, and if your Mac doesn’t have sufficient RAM or processing power, it can struggle to keep up with the demands of the browser and the websites you visit.
- Multiple Open Tabs and Extensions: The more tabs and extensions you have open in Chrome, the more memory and CPU resources the browser consumes, leading to a slower experience.
- Outdated Software: Running an outdated version of Chrome or macOS can contribute to performance issues, as newer versions often include optimizations and bug fixes.
- Corrupted Data and Caches: Over time, Chrome can accumulate corrupted data, caches, and browsing histories, which can slow down its performance.
- Hardware Issues: In some cases, hardware problems, such as a failing hard drive or overheating issues, can also cause Chrome to run slowly on your Mac.
Now that you understand the potential reasons why Google Chrome is slow on your Mac, let’s explore some solutions to help speed it up.
Also read: How to Uninstall Chrome on Mac: A Comprehensive Guide
Google Chrome Slow on Mac? Try These Fixes!
Try these expert-recommended methods to fix “Google Chrome lagging on MacBook”.
Solution 1: Close Unnecessary Tabs and Extensions
Is Chrome slow on Mac? One of the easiest and most effective ways to improve Chrome’s performance is to close unnecessary tabs and extensions. Each open tab and extension consumes additional memory and processing power, which can quickly add up and slow down your browser.
To close tabs in Chrome, simply click on the “X” button on the tab you want to close or right-click on the tab and select “Close Tab.” You can also use keyboard shortcuts like Cmd + W (on Mac) to close the current tab or Cmd + Shift + W to close all tabs at once.
To manage and disable unnecessary extensions, follow these steps:
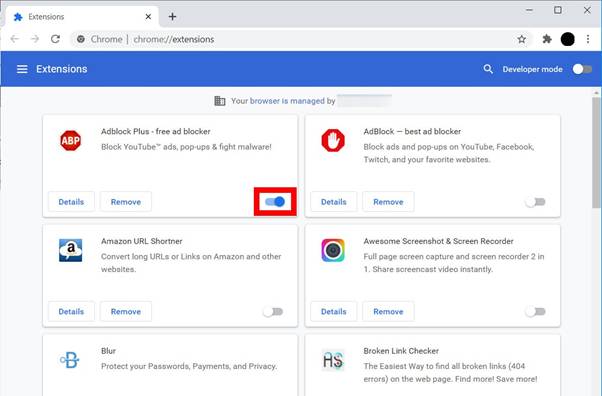
Step 1: Click on the three-dot menu icon in the top-right corner of Chrome. Select “Extensions.”
Step 2: Go through the list of installed extensions and disable or remove any extensions you don’t need or use frequently.
By keeping the number of open tabs and enabled extensions to a minimum, you’ll free up valuable system resources, which can help Chrome run smoother and faster on your Mac.
Solution 2: Update Chrome and macOS to the Latest Version
Google regularly releases updates for Chrome that include performance improvements, bug fixes, and security patches. Similarly, Apple periodically releases updates for macOS, which can also improve overall system performance and compatibility with applications like Chrome.
To check for updates and ensure you’re running the latest version of Chrome, follow these steps:
Step 1: Open Chrome and click on the three-dot menu icon in the top-right corner. Select “Help” > “About Google Chrome.”
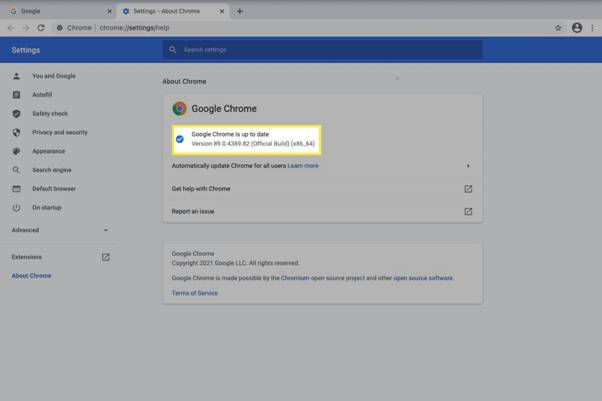
Step 2: Chrome will automatically check for updates and download the latest version if available.
Step 3: Once the download is complete, click “Relaunch” to install the update.
To update macOS, follow these steps:
Step 1: Click on the Apple menu in the top-left corner of your screen. Select “System Preferences” >”Software Update.”
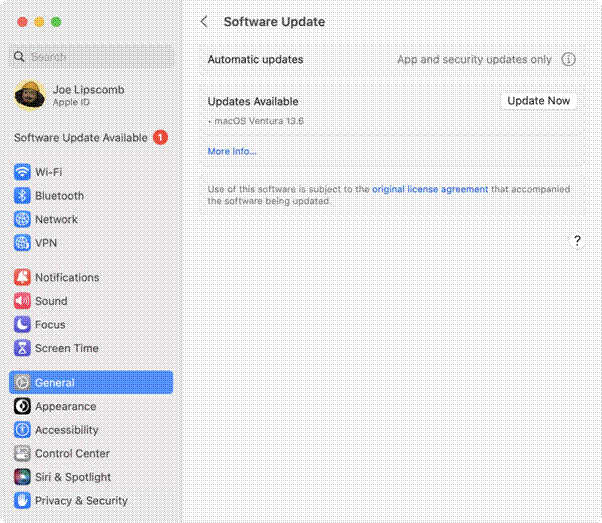
Step 2: If an update is available, click “Update Now” to download and install it.
Keeping Chrome and macOS up to date can help resolve performance issues and ensure you’re benefiting from the latest optimizations and improvements.
Solution 3: Clear Cache and Browsing Data
Over time, Chrome accumulates a significant amount of cached data, browsing histories, cookies, and other temporary files. While this data is designed to improve performance by reducing the need to re-download resources, it can eventually become bloated and counterproductive, slowing down your browsing experience.
To clear your cache and browsing data in Chrome, follow these steps:
Step 1: Click on the three-dot menu icon in the top-right corner of Chrome. Select “Clear browsing data”.
Step 2: In the pop-up window, select the time range for the data you want to clear (e.g., last hour, last day, last week, etc.).
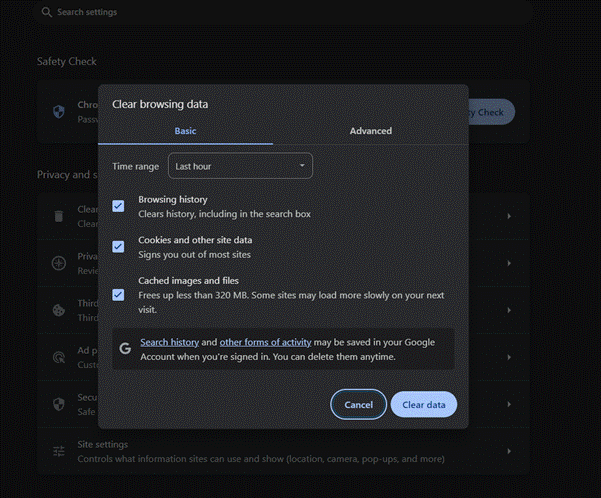
Step 3: Check the boxes for the types of data you want to clear, such as browsing history, cached images and files, cookies, and other site data. Click “Clear data” to complete the process.
After clearing the cache and browsing data, Chrome should run smoother and faster, especially when loading websites you’ve visited before.
Also read: How To Clear Search History On Mac – Safari, Chrome, and Firefox
Solution 4: Disable Hardware Acceleration (If Applicable)
Hardware acceleration is a built-in Chrome feature that utilizes your Mac’s graphics processing unit (GPU) to improve performance and rendering speeds. However, in some cases, hardware acceleration can cause compatibility issues or conflicts, leading to slower performance or visual glitches.
If you suspect hardware acceleration is causing problems with Chrome on your Mac, you can try disabling it. Here’s how:
Step 1: Open Chrome and click on the three-dot menu icon in the top-right corner. Select “Settings.” Scroll down and click on “Advanced” to expand the advanced settings.
Step 2: Under the “System” section, toggle off the “Use hardware acceleration when available” option.

Step 3: Restart Chrome for the changes to take effect.
After disabling hardware acceleration, Chrome may run slower for certain graphics-intensive tasks, but you may see an overall improvement in performance and stability.
Also read: How to Refresh on Mac: Boost Your Mac’s Performance
Solution 5: Reset Chrome’s Settings
If none of the above solutions have worked, or if you suspect that Chrome’s settings or configuration has become corrupted, you can try resetting Chrome to its default settings. This will restore Chrome to its original state, clearing all extensions, browsing data, and settings.
To reset Chrome’s settings, follow these steps:
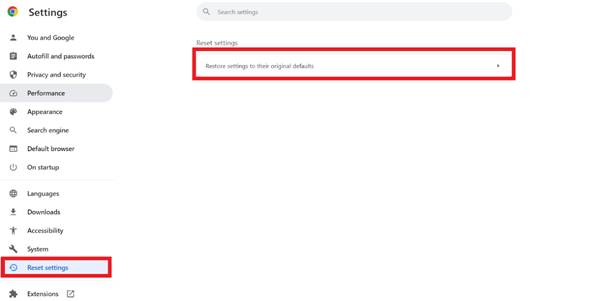
Step 1: Open Chrome and click on the three-dot menu icon in the top-right corner. Select “Settings.” Scroll down and click on “Advanced” to expand the advanced settings.
Step 2: Under the “Reset and clean up” section, click on “Reset settings to their original defaults.” In the confirmation dialog, click “Reset settings” to proceed with the reset.
After Chrome has been reset, you’ll need to reconfigure your settings, install any desired extensions, and import any bookmarks or browsing data you may have backed up previously. While this may seem like a drastic solution, it can often resolve stubborn performance issues caused by corrupted or misconfigured settings.
Solution 6: Consider Switching to a Different Browser
If the problem persists, and you’re still experiencing a performance dip while browsing with Chrome on your Mac, it may be worth considering switching to a different browser, at least temporarily.
Browsers like Safari, Firefox, or Microsoft Edge may perform better on your Mac, especially if you’re running an older or less powerful system. Different browsers have varying resource requirements and optimizations, so trying alternative options can sometimes provide a better user experience.
Also read: How To Reduce Ram Usage on Mac | How to Clear Memory on Mac
Conclusion
So, now you know all about why Google Chrome is so slow on Mac. Dealing with a sluggish Chrome browser on your Mac can be frustrating, but there are several solutions available to help resolve the issue. By following the steps outlined in this article – like closing unnecessary tabs and extensions, updating Chrome and macOS, clearing cache and browsing data, disabling hardware acceleration or Chrome’s prediction service, resetting Chrome’s settings, checking for hardware issues, or even switching to a different browser –you can potentially improve Chrome’s performance and enjoy a smoother browsing experience.
Remember, regular maintenance and keeping your software and hardware up-to-date can go a long way in preventing performance issues. If you continue to experience persistent problems, don’t hesitate to seek professional assistance or consult Apple’s support resources.
 How to Increase Download Speed on Mac
 How to Refresh on Mac : Boost Your Mac’s Performance
 How To Reduce Ram Usage on Mac | How to Clear Memory on Mac
 10 Best Download Managers For Mac In 2024