How to Uninstall Chrome on Mac: A Comprehensive Guide

Google Chrome has long been one of the most popular web browsers, known for its speed, stability, and extensive range of features. Whether you’ve decided to switch to a different browser or simply want to free up some disk space, uninstalling Chrome from your Mac may be on your to-do list.
While the process may seem straightforward, there are a few crucial steps to consider to ensure a clean and complete browser removal.
In this comprehensive guide, we will take you through the step-by-step process of how to uninstall Chrome on Mac, highlighting essential considerations along the way. We’ll cover various methods, including the standard uninstallation process, as well as automatically removing the residual files that may be left behind.
So, whether you’re a tech-savvy Mac user or just starting to explore your computer’s settings, this guide will equip you with the knowledge needed to successfully remove Chrome from your Mac system.
Also read: How to Setup And Cast From Mac to Chromecast
|
But before you begin… If you are planning to uninstall Google Chrome on Mac using the manual methods, here is something you can try first. When it comes to managing installed applications and thoroughly removing unwanted software from your Mac, the Cleanup My System Mac app is a valuable tool to have. With its intelligently designed Uninstaller and the powerful Uninstall Manager feature, you can effortlessly eliminate troublesome apps and ensure their corresponding files are completely eradicated, leaving no remnants behind. 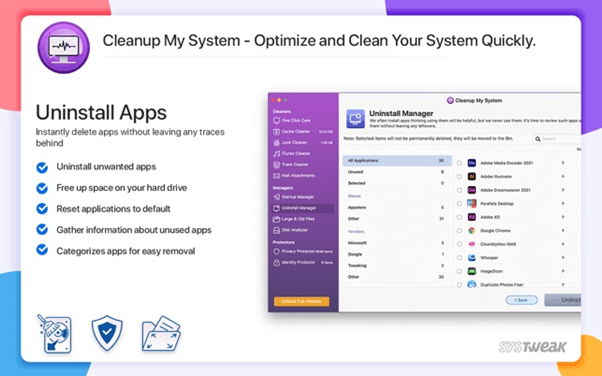 Cleanup My System offers a seamless solution for uninstallation, streamlining the process of removing unwanted software from your Mac. By utilizing the Uninstall Manager, you can easily get rid of problematic apps that may be cluttering your system, while also ensuring that all associated files are effectively eliminated. |
How to Uninstall Chrome on Mac Manually
If you prefer to uninstall Chrome on your Mac manually, you can follow these steps:
Part 1: Clear Browsing Data
Before uninstalling Chrome, it’s a good idea to clear your browsing data to remove any saved passwords, cookies, and cache. This step is optional, but it helps maintain your privacy and ensures a clean start if you decide to reinstall Chrome later. Here’s how to clear your browsing data:
Step 1: Open Google Chrome on your Mac.
Step2: Click on the “Chrome” menu located in the top-left corner of the screen, next to the Apple logo.
Step 3: From the drop-down menu, select “Clear Browsing Data.” Alternatively, you can use the keyboard shortcut “Command+Shift+Delete” to access this menu directly.
Step4: In the “Clear Browsing Data” window that appears, you can choose the time range for which you want to clear the data. If you want to remove all browsing data, select “All time.”
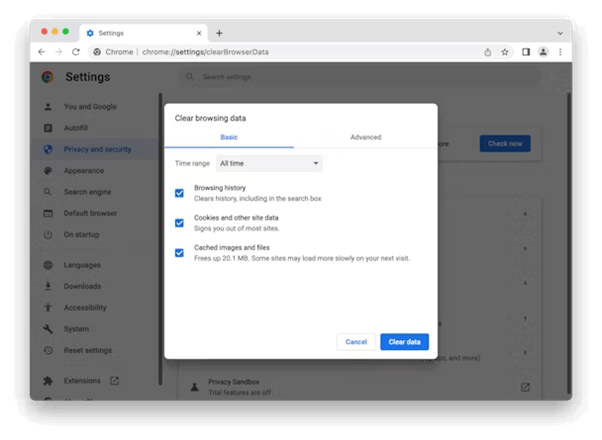
Step 5: Select the types of data you want to delete. For a comprehensive removal, it is recommended to select options like “Browsing history,” “Cookies and other site data,” and “Cached images and files.”
Step 6: Finally, click on the “Clear Data” button to initiate the process.
Once the browsing data is cleared, you can proceed with the next steps to uninstall Chrome manually.
Also read: How To Clear Search History On Mac – Safari, Chrome, and Firefox
Part 2: Force Quit Google Chrome
After clearing your browsing data, it’s important to ensure that Google Chrome is not running before proceeding with the uninstallation process. Here’s how you can force quit Google Chrome:
Step 1: Look for the Google Chrome icon in your Dock, which is typically located at the bottom of your screen.
Step 2: Right-click on the Google Chrome icon in the Dock. A context menu will appear. Move your cursor over the “Quit” option in the menu.
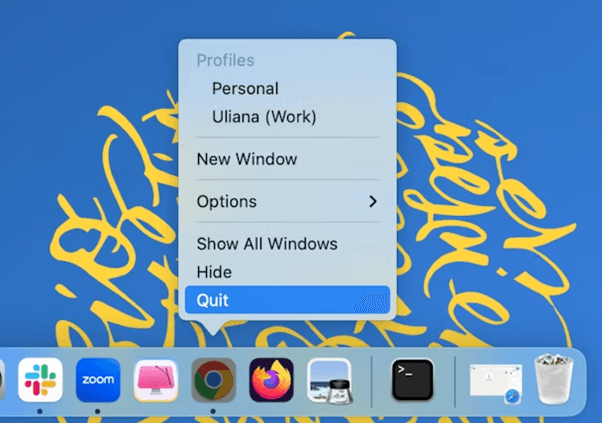
Step 3: If you see a submenu, select “Quit” from there. This will close all Chrome windows and end any background processes.
Step 4: If you don’t see a submenu, continue holding the Control key and click on the Google Chrome icon again. This time, you should see the option to “Quit” directly in the context menu. Click on it.
By force quitting Google Chrome, you ensure that all Chrome processes are terminated, allowing you to proceed with the manual uninstallation process without any interference from the browser.
Also read: How To Reduce Ram Usage on Mac | How to Clear Memory on Mac
Part 3: Delete Chrome Profile Info
To ensure no redundant files are left behid after uninstalling Chrome on Mac, it’s essential to delete the Chrome profile information and associated service files stored on your hard drive. Here are the steps to locate and delete these files:
Step 1: Open a new Finder window by clicking on the Finder icon in your Dock.
Step 2: In the menu at the top of the screen, click on the “Go” option. From the dropdown menu, select “Go to Folder.” Alternatively, you can use the Command-Shift-G key shortcut to directly open the “Go to Folder” window.
Step 3: A small window will appear, prompting you to enter a folder path. Copy and paste the following path into the text field: ~/Library/Application Support/Google/Chrome
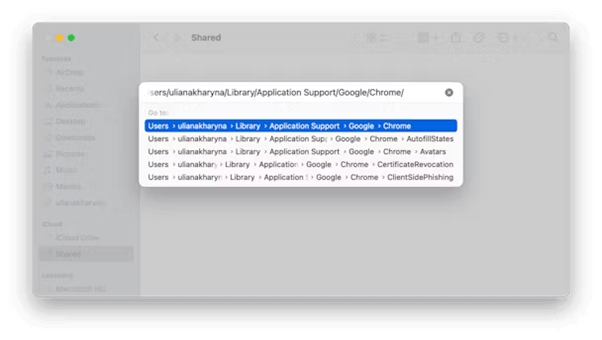
Step 4: Press the “Return” key on your keyboard or click the “Go” button.
Step5: The Finder window will now navigate to the specified directory, which contains the Chrome profile information and service files.
Step 6: Within this folder, you will find various files and folders associated with your Chrome profile. Select and delete them. You may be required to enter your administrator password to confirm the deletion.
And that’s it! This was the final step in our guide on how to uninstall Google Chrome on Mac.
Also read: How to Uninstall Google Drive From Mac
A Step-by-Step Guide to Uninstalling Chrome on Mac!
In this guide, we covered essential steps to ensure a clean and thorough removal of Chrome on macOS. Remember, whether you’re switching to a different browser or simply exploring new options, it’s essential to follow these steps to ensure a clean uninstallation. Leaving behind leftover files or preferences can potentially impact your system’s performance and interfere with the installation of alternative browsers.
Was this post helpful? Feel free to share your thoughts in the comments section!
[recommended title=”Must Read” postid=”6449,1217,6682,6481″]