How To Fix “Zsh Permission Denied” Error In Mac Terminal
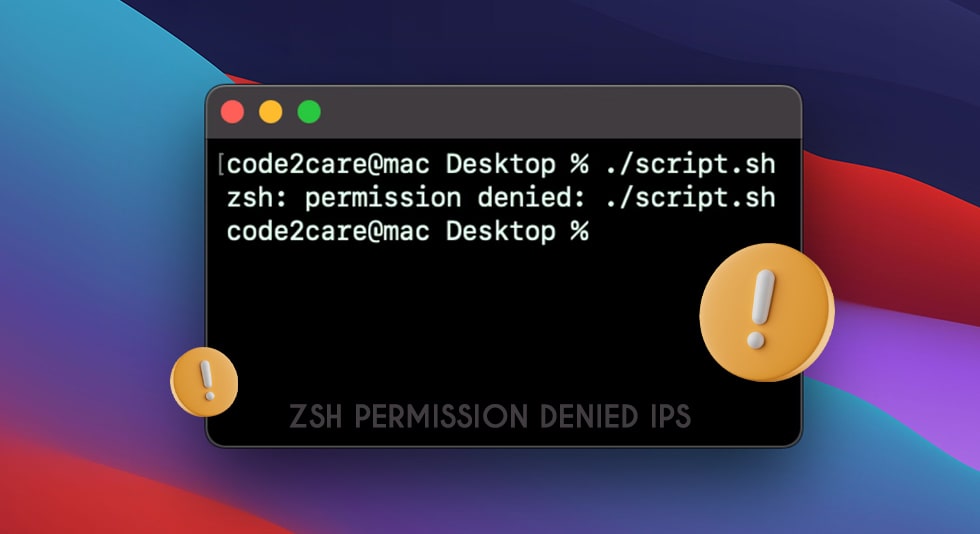
When navigating through the Mac Terminal, encountering a “permission denied” error in Zsh can be quite frustrating. This common issue often arises due to restricted access to specific files or directories. However, fear not! There are several effective ways to resolve this error and regain smooth sailing within your Terminal.
Let’s dive into the troubleshooting steps to fix the “Zsh permission denied” issue on your Mac.
What is Zsh & Why does “Zsh Permission Denied Mac Error” appear?
Zsh or Z Shell, is a powerful and inutitive command-line interpreter designed for Unix-based systems. However, it is often used as an alternative to the default Bash in macOS terminals.
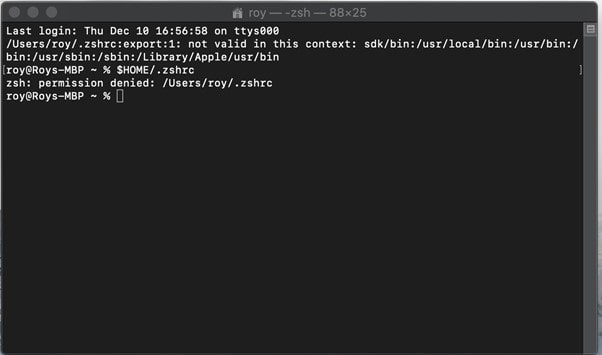
The Permission denied Mac Terminal error is a common problem that users encounter while using the Zsh shell in the Mac Terminal. It occurs when attempting to execute a command or access a file or directory without the necessary permissions. This error often surfaces due to restricted user access, preventing the execution or modification of specific files or directories.
Resolving this issue involves adjusting permissions or ownership settings to grant the required access, enabling smooth functionality within the Zsh environment.
What Causes the Zsh Permission Denied Error on Mac?
Here are the common causes behind the “Zsh permission denied” error on macOS:
- Insufficient Permissions: Attempting to access or modify files/directories without adequate permissions.
- File Ownership: Files or directories may be owned by another user, restricting your access.
- Executable Permissions: Lack of execute permissions for scripts or programs.
- System-Level Restrictions: macOS security settings may prevent access to certain files or directories.
- Incorrect Path: Incorrectly referencing the file path can lead to permission denial.
- Restricted Directory Access: Trying to write or modify in a directory where your user lacks the necessary privileges.
Resolving these issues often involves adjusting permissions, modifying ownership, or adjusting settings to grant necessary access within the Zsh shell.
Also Read: How to Open and Use Terminal on Mac
How to Fix the Zsh Permission Denied Error on macOS?
Here are a few tried and tested ways to fix “Zsh Permission Denied Mac Error”:
Method 1: Check File Permissions
Encountering the Permission denied Mac Terminal error in macOS can impede your tasks. To resolve this, follow these steps:
Step 1: Navigate to the directory in Terminal that contains the file triggering the error.
Step 2: Utilize the ls -l command to inspect permissions for the problematic file or directory.
Step 3: Modify inadequate permissions using the chmod command. For example, chmod +x filename grants execute permission.
Step 4: Ensure directories have the necessary execute permissions (chmod +x directory).
Step 5: Exercise caution with sudo to temporarily gain extended privileges if necessary, but use it judiciously to avoid unintended system changes.
Remember, altering permissions can significantly impact system operations, so proceed with care and verify changes before implementation.
Method 2: Review Read & Write Permissions Using Finder
Finder provides a user-friendly graphical interface for managing permissions, offering an alternative solution to address the permission-denied issue in Zsh. Here are the steps to review permissions using Finder:
Step 1: Locate the file or directory triggering the error in Finder.
Step 2: Right-click on the file or directory and select “Get Info” from the dropdown menu.
Step 3: In the Info window, navigate to the “Sharing & Permissions” section.
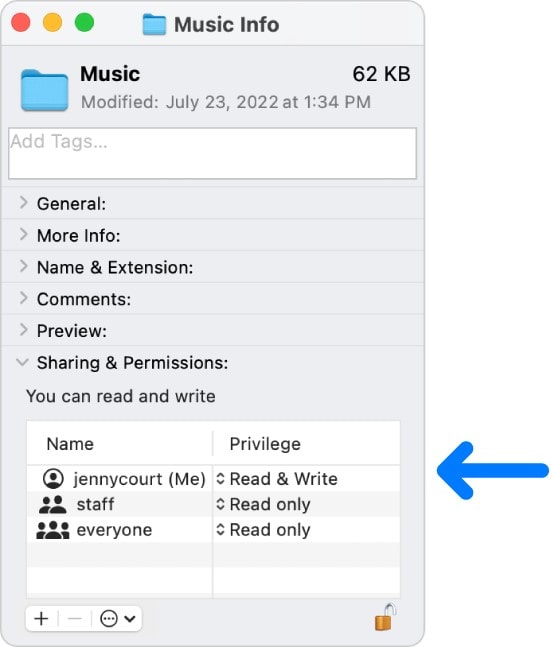
Step 4: Check and modify permissions by clicking the lock icon, entering your credentials, and adjusting privileges for the necessary users or groups.
Step 5: Ensure your user account has the required read and write permissions.
Step 6: Close the Info window and attempt accessing the file or directory again via the Terminal.
Also Read: How to Hide or Unhide Files Using Terminal on Mac
Method 3: Change the Ownership of Directory Using Terminal
To resolve ownership-related permission issues, follow these steps:
Step 1: Open Terminal and navigate to the directory for which ownership needs to be changed.
Step 2: Utilize the chown command followed by the new owner’s username and the directory name.
For instance:
sudo chown new_owner_username directory_name
Replace “new_owner_username” with the appropriate username and “directory_name” with the actual directory name.
Step 3: Enter your administrator password when prompted (if using sudo) and press Enter.
Step 4: Confirm ownership changes using the ls -l command to review updated ownership details.
Changing ownership through chown can resolve permission issues within directories, granting control to a different user. Make sure to use the correct username specifications for a successful ownership transfer.
Also Read: Streamlining Your Mac’s Storage: How to Delete Partition on Mac
Method 4: Enable Full Disk Access
Here comes another method to fix the zsh permission denied Mac error. The problem can be resolved by granting Terminal full access to your disk. Follow these steps:
Step 1: Navigate to “System Preferences” on your Mac.
Step 2: Select “Security & Privacy.”
Step 3: Click on the “Privacy” tab.
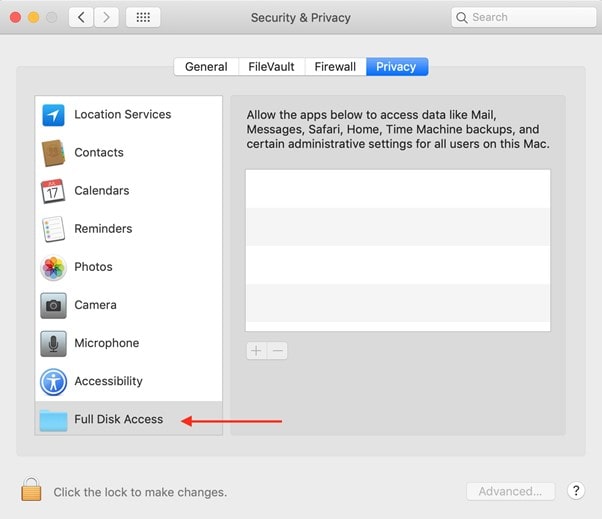
Step 4: From the left sidebar, choose “Full Disk Access.”
Step 5: Click the lock icon at the bottom left and enter your administrator password to make changes.
Step 6: Drag and drop Terminal from the Applications folder into the allowed apps list.
Step 7: Close the lock icon to save changes.
Enabling full disk access for Terminal grants it necessary permissions to access files and directories across your system, potentially resolving the permission denied issue in Zsh.
Also Read: How to Unlock Your Macbook Pro Without Password
How to Avoid Zsh Permission Denied Error on Mac?
Here are some tips to help avoid encountering the “Zsh permission denied” error on a Mac in the future:
- Mind ‘sudo’ Use: Be selective with ‘sudo’ to avoid unintended system changes.
- Limit Permission Changes: Refrain from altering critical system permissions.
- Verify File Ownership: Confirm ownership with ls -l to avoid conflicts.
- Caution with Recursive Commands: Use -R sparingly to prevent mass changes.
- Backup Before Modifications: Always back up important files before making alterations.
- Stay Updated: Keep macOS updated for security and stability.
- Check File Paths: Double-check paths to prevent permission errors.
By adhering to these best practices, you can reduce the likelihood of encountering the Permission denied Mac Terminal Zsh error and maintain smoother Terminal operations on macOS.
Conclusion | Overcome Zsh Permission Denied in Mac Terminal Error
Mastering permissions in macOS Terminal and Zsh is key. To dodge the pesky “Zsh permission denied” snag, be careful with powerful commands like ‘sudo’, keep a check on who owns files, and avoid making big changes unless you’re super sure.
Back up important stuff, keep your Mac updated, and always double-check file paths. These steps ensure a smooth ride through Terminal Land without permission pitfalls.
And, if you know any other workarounds that can help users in fixing the annoying error, then do let us know your suggestions in the comments section below!