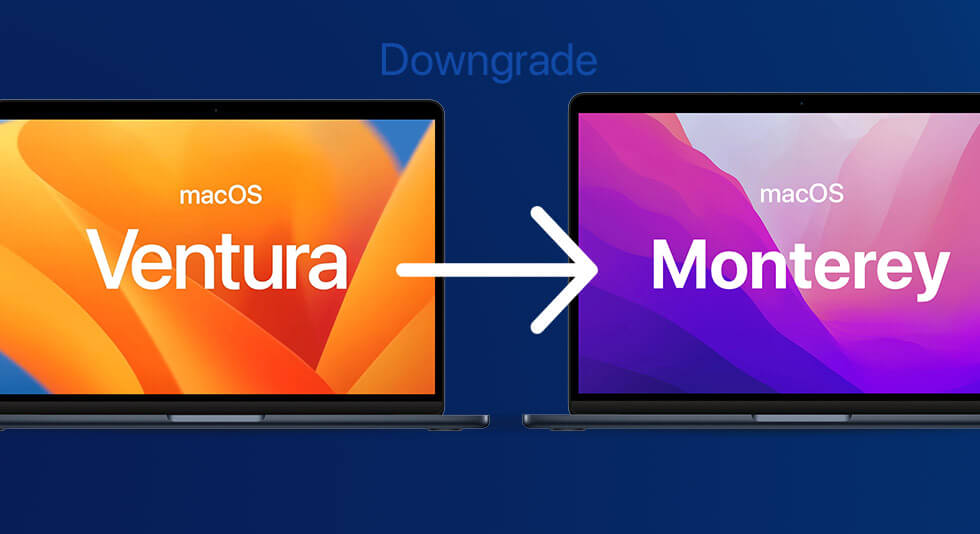
How To Downgrade From macOS Ventura To macOS Monterey
The latest macOS Monterey is packed with features. Still, since it is in the beta stage, the experience is not the same or relatively smooth for all users. Many users are looking to downgrade from macOS Ventura to Monterey. In this post, we’ll go on how you can downgrade to macOS Monterey from macOS Ventura and why you should do so.
Why Downgrade From macOS Ventura to macOS Monterey?
It is normal to look at the title of this post and wonder why downgrade an upper version to a lower one. Let’s quickly look at why you may want to downgrade from macOS Ventura to Monterey –
- Presence of bugs
- Various apps are not compatible with macOS Ventura.
- Slow performance, i.e., either the Mac would itself hang or the apps would.
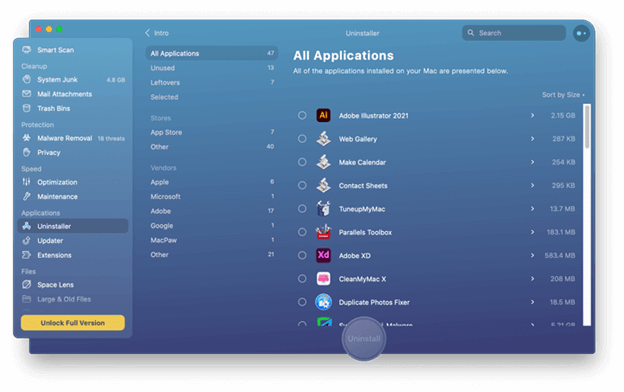
Before you take that crucial step of downgrading from macOS Ventura to macOS Monterey, a minor fix can help you resolve the performance issue. You can clean unnecessary system junk and uninstall unwanted apps or complex scripts. The easiest way to do this is to use a tool like CleanMyMac X. Let’s give you a glimpse of how CleanMyMac X can help you get rid of junk and complex maintenance scripts –
1. Download, run and install CleanMyMac X.
2. From the left-hand side, under Speed, click on Maintenance.
3. From the right-hand side, check the Run Maintenance Scripts.
4. Furthermore, you can head to the Uninstaller under Applications and uninstall any recently installed applications if the problem has started to arise lately after you had installed an application.
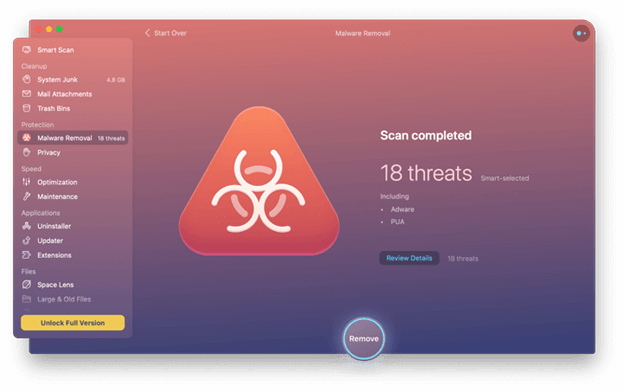
In addition to the above, CleanMyMac X lets you scan your Mac for any Malware. This way, you can check your Mac for any malicious threats before they further lead to more severe issues.
This was just a glimpse of what CleanMyMac X is capable of. To know more about this wonderful Mac cleaner, its pricing, and other aspects, check out our inside-out review of CleanMyMac X.

What Are The Prerequisites To Downgrade to macOS Monterey From macOS Ventura?
- You need an active internet connection with a decent speed.
- It is important that you take a backup of your existing data because once you have downgraded your Mac from macOS Ventura to macOS Monterey, all of the data will be erased permanently. You can take a backup of your complete data using Time Machine and then later restore from it.
- Create a bootable macOS Monterey installer drive. This is necessary if you have an Apple Silicon-based Mac.
- It is important that you keep your Mac plugged in when the downgrading occurs from macOS Ventura to Monetary.
How To Downgrade macOS Ventura to macOS Monterey
Here, we are going to discuss 3 ways of downgrading macOS Ventura to macOS Monterey –
1. Use Time Machine to Downgrade macOS Ventura to Monterey
You probably had taken a backup of macOS Monterey and other data before installing macOS Ventura Beta version. If you did, here is how you can downgrade macOS Ventura to Monterey with the help of a Time Machine backup –
1. Attach your Time Machine hard drive to your Mac.
2. Click on the Apple icon and then select Restart.
3. Head to the boot selection screen and –
- For Apple Silicon-based Macs –
- Press and hold down the Power button till you see the startup screen.
- Select Options.
- Click on Continue
- For Intel-Based Macs –
- Press and hold the Command + R key combination.
- Wait till you see the Apple Logo or hear the startup chime
4. Choose Restore from Time Machine Backup
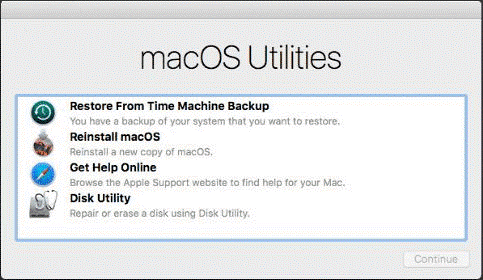
5. Click Continue
6. Follow the on-screen process and click on Continue.
7. Select your Backup source and click on Continue
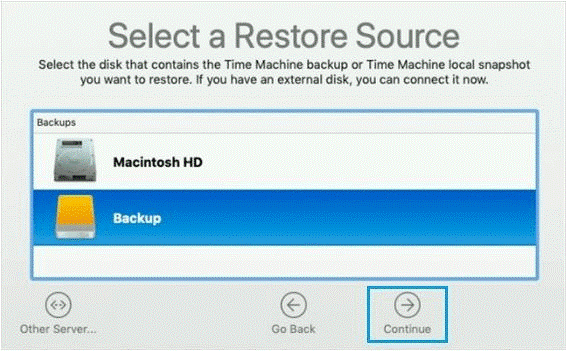
8. Choose a recent macOS Montrerey backup and click on
2. Take The Help of macOS Recovery To Downgrade macOS Ventura to Monterey
Don’t have a backup? Needn’t worry! You can downgrade to macOS Monterey from macOS Ventura using macOS recovery. All you need is an active and stable internet connection. Here are the steps –
1. Shut down your Mac.
2. Now power it on and immediately press and hold one of the following key combinations –
- Command + R – Reinstall the current macOS version (Ventura)
- Shift + Option + Command + R: Reinstall the macOS that was shipped with your Mac.
- Option + Command + R: Your macOS will be upgraded to the latest supported macOS.
3. Enter your Password > Click on Continue
4. Follow the on-screen instructions
and Wait for the installation process to complete. At this point, don’t close the lid of your MacBook or put it off to sleep. You needn’t even worry if you see your Mac restarting several times. You will be able to see the progress bar (or see it disappear), and your screen might even go blank for a while.
3. Use Bootable Installer to Downgrade macOS Ventura to Monterey
- Intel-based Macs. First, you might not be able to install macOS Monterey because you have an Intel-based Mac that further has a secure T2 chip. In that case, here are the steps that will help you disable the external protection on your Intel-based Mac –
1. Reboot Mac while holding the Option
2. Release the key when you see the boot selection screen and immediately press the Command + R to enter the Recovery Mode.
3. When in the Recovery Mode, click on Utilities and select Startup security utility
4. Enter your Mac’s password
5. Select Allow booting from external or removable media.

Now that you have disabled the external boot protection, it’s time to install macOS Monterey with the help of a Bootable installer –
1. Reboot Mac while holding the Option key. Do this until you have landed on the boot selection screen.
2. Boot to USB installer for Monterey.
3. Allow verification of the external disk
4. Click on Disk Utility and then click on Continue.

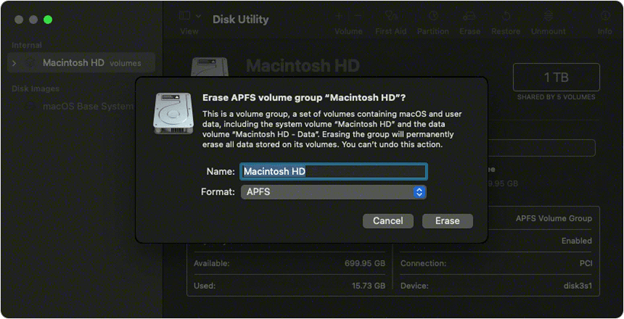
5. Under internal, click on Macintosh HD and Erase.
6. Click the Erase Volume Group.
7. Once the process is complete, click on Done
8. Select Disk Utility and then select Quit Disk Utility.
9. Install macOS Monterey and click on Continue.
10. Select Macintosh HD and then click on Continue.
- Apple Silicon-Based Macs
If you have an Apple Silicon Mac, follow these steps –
- Shut down your Mac.
- Press and hold down the Power button till you see the startup options.
- Click the USB installer.
- Click Continue.
- Click on Install macOS Monterey
- Choose Quit and install macOS
- Click on Disk Utility
- Select Continue
- Under Internal, click on Macintosh HD and click on Erase
- When the process completes, click on Done.
- Click on Disk Utility and then choose Quit Disk Utility.
- Activate the Mac and click on Exit to Recovery.
- Select Macintosh HD and click on Continue
- Select Startup Disk and click on Restart.
What Should I Do If I Am Unable To Downgrade macOS Ventura To Monterey?
While we have tried to curate the rightful steps that should help you downgrade to macOS Monterey from macOS Ventura, if the downgrading is unsuccessful, you will have to bear with macOS Ventura betas. You can continue updating them to newer versions when they are rolled out. Later this year (by fall, preferably), you will be able to upgrade to a more stable and final version.
Wrapping Up
Were you able to downgrade from macOS Ventura to macOS Monterey successfully? If yes, was your journey smooth, or did you hit some bumps along the way? Do shrew your experience in the comments section below. For more such information, fun-filled, tech-related content, keep reading content, keep reading BestMacCleaner.
 Best Browser For Mac in 2024: Fastest & Lightest
 10 Best Duplicate Photo Finder For Mac 2024
 How To Fix macOS Monterey is Running Slow Issue
 How to Downgrade to macOS Catalina from macOS Big Sur
 How To Show Hidden Files On MacOS