How to Backup iPhone, iPad to MacBook | Don’t Lose Your Precious Memories
Backing up your iPhone or iPad to your MacBook is an essential practice to safeguard your valuable data. In this digital era, where our devices store countless memories and crucial information, knowing how to efficiently create backups ensures peace of mind against unexpected data loss.
Whether you’re upgrading to a new device or safeguarding your files against mishaps, mastering this process is pivotal. Wondering how to backup iPhone to MacBook? You’ve come to the right place. This guide will walk you through simple yet effective methods to back up your iPhone or iPad to your MacBook, preserving your photos, messages, settings, and more.
Also Read: MacOS Sonoma 14.0 Unveiled: New Widgets, Features, Game Mode, Safari Updates, and More!
Why Back Up Your iPhone/iPad to Your MacBook?
Whether you want to backup iPad to your Mac or your iPhone, here are a few key reasons you should consider it essential:
1. It keeps your data safe
By backing up your other device’s data to your Mac, you have a copy of your contacts, photos, videos, app data, etc. If anything happens to your phone or tablet, you can restore that data to a new or replacement device.
2. It’s more reliable than iCloud
While you can backup to iCloud, it has storage limits unless you pay for additional storage. Backing up locally to your Mac provides more reliable and essentially unlimited backup capacity.
3. It makes resetting or replacing your device easier
If you ever need to reset your iPhone/iPad to factory settings or set up a new device, having aMac backup makes restoring your apps, settings, and data a hassle-free process.
4. It facilitates moving to a new iPhone/iPad
When you upgrade to a new iPhone or iPad, being able to restore them from a Mac backup allows you to quickly transfer all your existing content without starting from scratch.
5. It provides extra protection against lost or damaged devices
If your iPhone/iPad is ever lost, stolen or too damaged to power on, having a Mac backup serves as an invaluable archive of your mobile data.
Also Read: Best Mac Backup Software For Your Mac
How to Backup iPhone to MacBook: Step-by-Step Guide!
While the specific steps may slightly vary between different macOS versions, backing up to a Mac generally follows this same basic process:
Things You’ll Need to back up iPhone to MacBook:
- The Mac and iPhone/iPad you wish to backup from and to.
- A Lightning to USB cable for connecting your iOS device to your Mac.
- An iCloud account (optional but recommended as an additional backup).
- A minimum of 1GB storage space on your Mac – more space is needed for larger backups.
Part 1: How to Backup iPhone to MacBook (macOS Monterey 12.5 and Later)
For those with a latest Mac, the procedure is straightforward. The guidelines provided below cater to Mac systems operating on macOS Monterey 12.5.
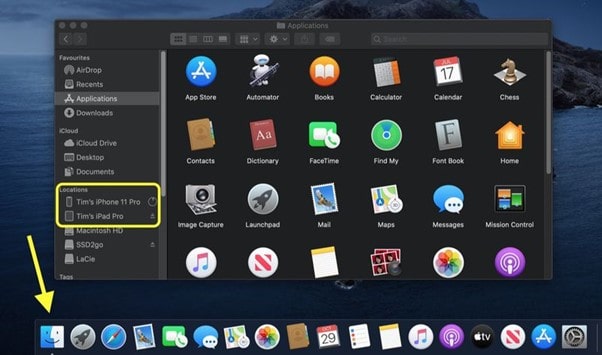
Step 1: Connect your iPhone/iPad to your Mac using the charging cable.
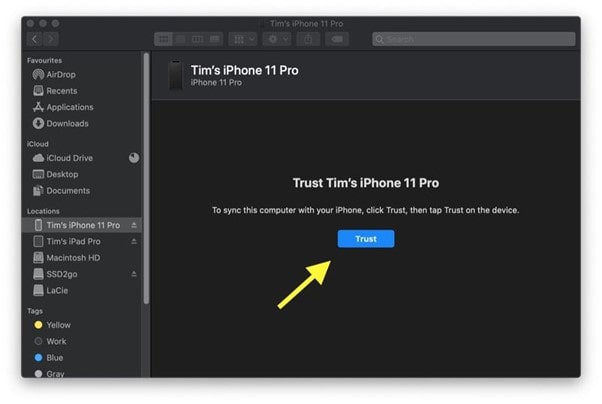
Step 2: Open Finder and look for your iPhone on the left side. Tap Trust and enter your iPhone/iPad’s passcode so they both stay unlocked.
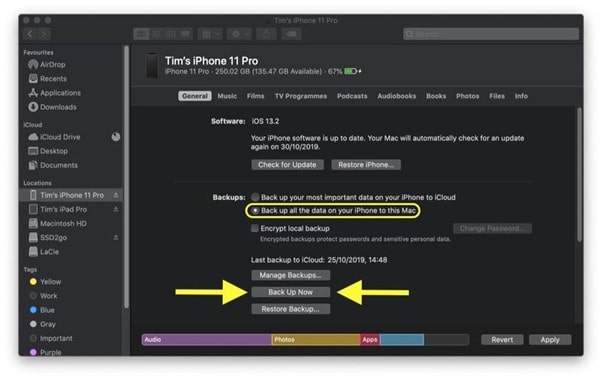
Step 3: Turn on Encrypt Backups and create a password.
Step 4: Check “Back up all the stuff from your iPhone to this Mac” in the “General” tab. Then, hit Back Up Now and wait for it to finish.
Also Read: How To Create & Restore From Time Machine Backup On Mac
Part 2: How to Backup iPhone to MacBook (Older Macs)
With older macOS editions, downloading iTunes is necessary for backing up your data. Once iTunes is installed, your device will automatically create backups upon connection to your computer. Alternatively, you can manually initiate the backup whenever needed. Here’s a guide on how to do it:
Step 1: Get iTunes onto your Mac by downloading and installing it.
Step 2: Open iTunes. It might prompt you for your Apple ID details. If iTunes asks to access your iPhone’s information, select Continue.

Step 3: Find your iPhone in the left-hand menu within iTunes.
Step 4: Switch on the “This Computer” option in the “Backups” section of iTunes.
Step 5: Click on Back Up Now and give it time to complete the process.
Also Read: How To Fix Mac Stuck Checking For Updates & Enjoy New Features
Conclusion | Backup Your iPhone and iPad to Your MacBook Safely and Easily
This wraps up our guide on how to backup iPhone to MacBook. In a world where our iPhones and iPads hold our memories, contacts, and important data, ensuring their safety is paramount.
Whether using the streamlined method through macOS Sonoma/Monterey or opting for iTunes on earlier systems, backing up your device to your MacBook is an effortless way to safeguard your files against unforeseen data loss. By following these simple steps, you’ve taken a crucial step in securing your digital life.
Regular backups ensure that cherished memories, essential contacts, and valuable information remain protected, allowing you to navigate through multiple device upgrades or unexpected mishaps with confidence.
Remember, investing a few moments in backing up your device can save countless hours of frustration later on.
FAQs:
How often should I back up my iPhone/iPad to my MacBook?
It’s advisable to back up your device regularly, ideally weekly or before any major updates or changes. This ensures you have the most recent data preserved if anything unexpected happens.
Will backing up my iPhone/iPad to my MacBook save everything?
Yes, the backup typically includes your device settings, app data, messages, photos, and other important content. However, some content, like synced media or content stored in iCloud, might not be included in the backup.
Can I access my backed-up data on my MacBook if needed?
Absolutely! You can access and restore your backed-up data through iTunes or Finder (depending on your macOS version). If needed, you can retrieve specific files or restore your entire device from the backup.