A Comprehensive Guide to Cropping Screenshot on Mac: Top 4 Methods
Taking screenshots is a great way to capture images from your Mac’s screen. Whether you want to save a conversation, instructional steps, a funny meme, or anything else you see, screenshots make it easy.
However, sometimes your screenshots contain more than intended. You may want to crop out unnecessary portions of the image before saving or sharing it. Cropping screenshots on a Mac is easy to do with the built-in Preview app and toolbar.
Wondering how to crop a screenshot on Mac. Well, in this guide, we’ll show you multiple ways how to crop a screenshot on Mac on macOS Monterey and later.
Let’s get started.
Also read: How to Take a Screenshot on Mac Step-By-Step Guide
What You Need Before Cropping Screenshots
To crop screenshots on your Mac, you’ll need:
- A Mac running macOS Monterey or later: Earlier versions of macOS have slightly different screenshot tools.
- A screenshot image: To take a screenshot, press Shift-Command-3 to capture the entire screen, or Shift-Command-4 to take a screenshot of the selected portion.
- The Preview app: It comes pre-installed on all Macs.
With those basics covered, let’s look at how to crop screenshots with the help of Preview and other Mac apps.
How to Crop a Screenshot on Mac?
Let’s get started with in-built methods to crop snapshots on MacBook:
Method 1: Crop a Screenshot in the Preview
Preview is the default app that opens when you take a screenshot on a Mac. It makes cropping screenshots fast and easy. Here are the steps:
Step 1: Press Shift-Command-3 or Shift-Command-4 to take a screenshot on your Mac. The screenshot will open automatically in Preview.
Step 2: In the Preview toolbar, click on the Markup toolbar icon (scissors icon) to open markup tools.
Step 3: Select the Crop icon. The crop box will appear over your image.
![]()
Step 4: Click and drag the crop handle corners to select the part of the screenshot you want to keep.
Step 5: Click the Done button above the image to crop.
Step 6: Choose File > Save to save your cropped screenshot. You can overwrite the original or give it a new name.
And that’s all there is to it! With just a few clicks, you can crop screenshots closely in Preview using the handy crop box.
Preview has some other useful tools as well for annotating screenshots, like adding text, shapes, highlights, and signatures. You can use these tools to highlight important parts before sharing your snips.
Also read: Best Tools To Take Scrolling Screenshots on Mac
Method 2: Use the Screenshot Toolbar to Crop
Starting with macOS Mojave, Apple added an optional floating toolbar that appears when you take screenshots. This toolbar lets you crop without opening Preview.
Here’s how to crop a screenshot on Mac using the screenshot toolbar:
Step 1: Take a screenshot with Shift-Command-3 or Shift-Command-4. The screenshot will initially appear in the bottom right corner of your screen. Above that, you can find the screenshot toolbar.
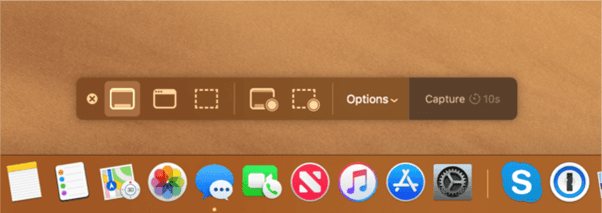
Step 2: Click on the Crop icon (triangles in a square). Click and drag the crop handles to select the part of the image to keep.
Step 3: Click the Done button above the image to crop it. If desired, click on the markup tools in the toolbar (pen icon) to draw or add text.
Step 4: Click the Delete or Save buttons in the toolbar when finished.
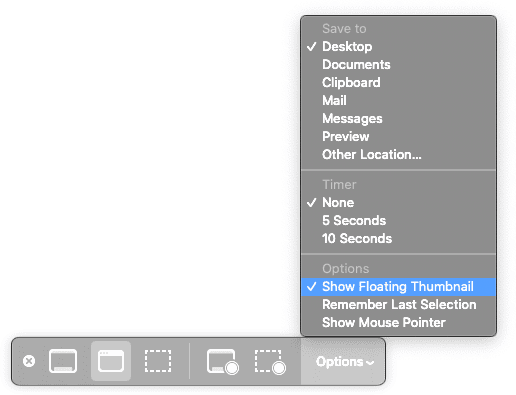
The floating toolbar is enabled by default on recent Mac versions. If you don’t see it, open System Preferences > Keyboard and check “Show floating thumbnail after screen capture.”
Cropping with the toolbar is quick, but it doesn’t give you all the tools available in Preview. Still, it’s a convenient option when you just need to do a fast crop without saving the image.
Also read: How to Enter and Exit Full Screen on Mac
Method 3: Use Keyboard Shortcuts to Crop Screenshots
For an even faster cropping experience, you can use keyboard shortcuts right after taking a screenshot:
- Pressing the Spacebar after taking a screenshot will immediately open Markup tools in Preview, where you can click the crop icon.
- Shift-Command-4: Instead of taking a standard screenshot, this shortcut lets you take a screenshot as per the selection via cursor. Just click and drag to select the exact area you want to capture.
So with the first shortcut, you can avoid the need to manually open Preview and access crop/markup more quickly. The second shortcut eliminated the need for cropping altogether by capturing only the desired area upfront.
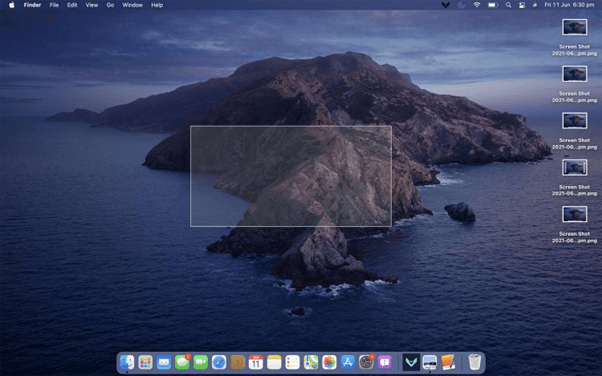
Method 4: Crop Screenshots on your Desktop
If you save screenshots to your desktop instead of cropping immediately, you can still easily crop them later:
Here are the simple steps for how to crop a screenshot on Mac:
Step 1: Find the screenshot file on your desktop. Double-click the image file to open it in Preview.
Step 2: Click the Markup toolbar icon and select the Crop tool. Adjust the crop box and click Done.
Step 3: Choose File > Save to overwrite the original with your cropped version.
This works for screenshot files saved anywhere on your Mac, not just the desktop. Opening them in Preview gives you access to all the same cropping and markup tools.
Also read: How To Set Up And Use Screen Sharing on Mac
Key Tips for Cropping Screenshots on Mac
So, now you know all about how to crop a screenshot on a Mac, right? Let’s recap some key tips:
- Use Preview for quick and easy screenshot cropping.
- Look for the Markup toolbar (scissors icon).
- Crop handles let you select the desired area.
- Save over the original or give it a new name.
- Use the floating toolbar to avoid opening Preview.
- Select just the area you want upfront with Shift-Command-4.
- Open screenshots in Preview to crop screenshots saved on your desktop.
- Try third-party apps for advanced editing features.
- iOS has built-in tools for cropping screenshots too.
Cropping screenshots may seem like a minor task, but it’s an important one for screenshot management.
Conclusion
This wraps up our guide on how to crop a screenshot on Mac using different methods. Removing unwanted areas makes screenshots clearer and easier to understand. Just remember the keyboard shortcuts and where to find crop tools, and you’ll be customizing screenshots perfectly in no time.
FAQs:
How can I crop a screenshot after taking it on my Mac?
After taking a screenshot, it will open automatically in the Preview app. In Preview, click the Markup toolbar button, select the Crop tool, and then drag the handles to crop the image.
What are the steps to crop a screenshot directly on a Mac?
The steps are: 1) Take the screenshot and it will appear on your screen. 2) Click the Crop icon in the floating toolbar. 3) Drag the crop handles to select the area you want. 4) Click Done to crop the screenshot.
Is there a quick way to edit and crop a screenshot on a Mac?
Yes, pressing the Spacebar after taking a screenshot will open the Markup editing tools in Preview immediately, allowing you to quickly crop before saving.
Can I crop a print screen on a Mac without additional software?
Yes, you can crop screenshots using only the Preview app that comes pre-installed on every Mac. Open the screenshot in Preview, use the Crop tool, and save the original to crop without any additional software required.