How To Set Up And Use Screen Sharing on Mac
In an increasingly interconnected world, effective communication and collaboration are paramount. Whether it’s for remote work, troubleshooting tech issues, or guiding a family member through a digital conundrum, the ability to share your screen with others is a powerful aspect. If you’re a Mac user, you’re in luck, as Apple’s macOS offers a robust and user-friendly feature called “Screen Sharing.”
Screen sharing on Mac enables you to effortlessly showcase your desktop or view someone else’s screen in real time, bridging the distance between individuals and fostering efficient collaboration. It’s an indispensable feature, allowing you to provide technical support, collaborate on projects, or even host virtual gatherings with ease.
In this blog, we’ll walk you through the process of how to screen share on Mac for a seamless and immersive sharing experience.
Let’s dive in and unlock the full potential of your Mac through this powerful collaboration tool.
What is Screen Sharing on Mac?
Screen Sharing on Mac is a feature built into macOS that allows users to remotely view and control another Mac computer’s screen. It facilitates seamless collaboration and technical support by enabling users to share their desktops with others over a network or the internet.
With Screen Sharing, you can securely connect to another Mac computer, whether it’s in the same local network or located at a distant location. Once the connection is established, you can see the remote Mac’s screen on your own display, and you’ll have the ability to control the other computers if you were sitting in front of it physically. This capability makes it incredibly convenient for troubleshooting issues, demonstrating a process, or working collaboratively on a project.
The Screen Sharing feature is a native part of macOS, meaning you don’t need to install any additional software to utilize it. It is built on the VNC (Virtual Network Computing) protocol, which ensures that the connection is secure and encrypted.
How to Screen Share on Mac: A Step-By-Step Guide!
Screen sharing on Mac is an invaluable tool for collaborating with colleagues, providing remote assistance, or simply sharing your screen with friends and family. In this step-by-step guide, we’ll walk you through the process of setting up and using Screen Sharing on your Mac.
Wondering how to allow screen sharing on Mac? Here’s the step-by-step process:
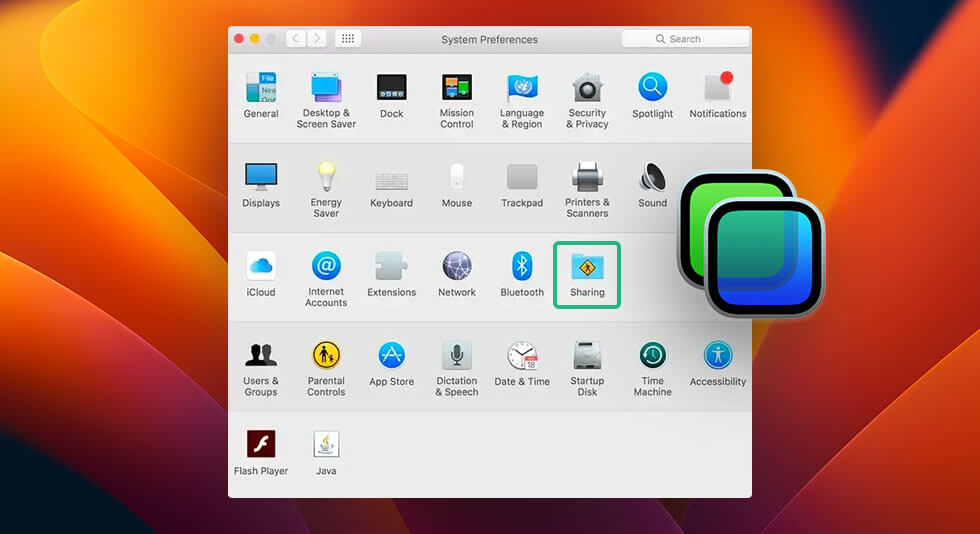
Step 1: Go to the Apple menu on the Mac you want to share from. Open System Preferences. Navigate to General and then Sharing.
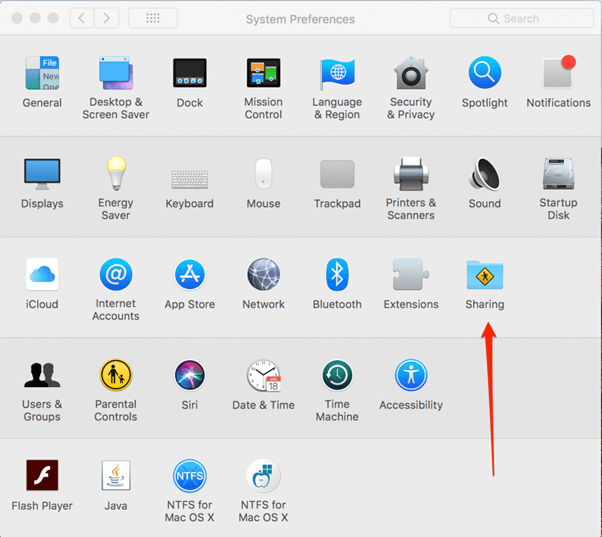
Step2: Choose whether to make your Mac accessible to all users with your permission or restrict access to specific users in your network.
Step 3: Turn on Screen Sharing.
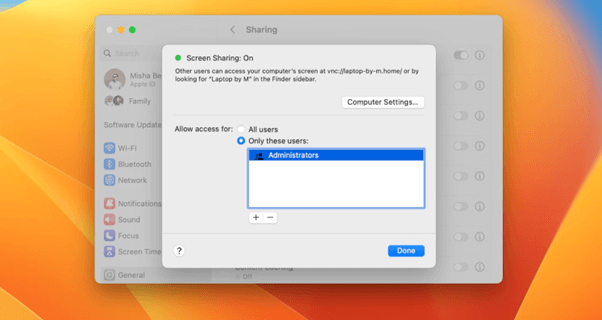
Step4: Click the Info button and note the name and address of the Mac (e.g., “My MacBook Pro” and vnc://[IPAddress] or vnc://[Name.Domain]).
Step 5: Click Done to complete the setup process.
To initiate a screen-sharing session with your Mac, viewers can follow these steps:
Open Finder and navigate to Locations, then select Network to connect using the Mac’s name. Alternatively, go to Finder, click Go, and then choose Connect to Server to connect using the Mac’s address.
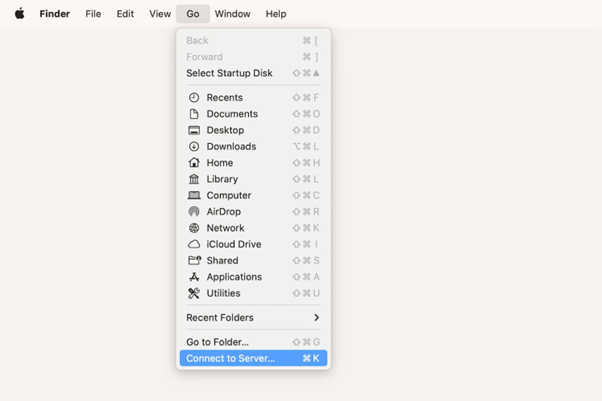
Select the name of the Mac you wish to view or enter its VNC address.
If prompted, enter the username and password of the person whose Mac you want to view, then click Sign In to begin the screen-sharing session.
Also read: How To Split Screen On Mac
Adjust Display Settings Before Sharing Screen on Mac
To customize your display settings for screen sharing on Mac, access the Screen Sharing Preferences menu and follow these steps:
Step 1: Ensure that Screen Sharing is enabled on your Mac.
Step2: Click on Screen Sharing in the Mac menu bar and choose Preferences.
Step 3: Opt to scale your screen or share the desktop in full size as per your preference.
Step4: Customize scrolling options and choose to show or hide the tab bar for an optimized experience.
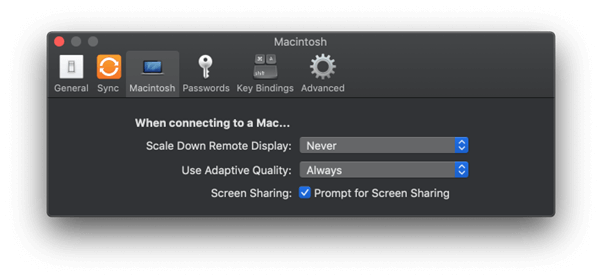
Step 5: Easily switch between Observe and Control display views, depending on your role during the screen-sharing session.
Step6: In case of a slow or inconsistent network connection, select Full or Adaptive Quality to enhance the viewing experience.
Also read: How to Take a Screenshot on Mac Step-By-Step Guide
How to Use FaceTime Screen Sharing
Using FaceTime screen sharing has become possible with the introduction of macOS Monterey 12.1 and iOS 15.1. Once all participants in the call are utilizing compatible software, you can easily initiate FaceTime screen sharing.
Here’s a simple guide to get you started:
Step 1: Open the FaceTime app on your device.
Step2: Create a New FaceTime call or select a contact to make a call.
Step 3: Once the call connects, locate and click on the SharePlay icon.
Step4: Choose whether to share a specific Window or your entire Screen.
From this point, all other participants in the call will be able to view the shared screen or window until you decide to end the screen-sharing session.
Also read: How To Fix Macbook Stuck on Loading Screen?
Best Online Tools to Screen Share on Mac
Below, we present a selection of widely-used online screen-sharing tools:
- Google Meet: Google’s web conferencing tool for high-quality video meetings and screen sharing.
- Zoom: Leader in video conferencing, offering reliable screen sharing for various purposes.
- Slack: Messaging platform with built-in screen sharing for quick collaboration and assistance.
- TeamViewer: Powerful remote access software for screen sharing and technical support.
- Microsoft Teams: Comprehensive communication platform with screen sharing during video calls.
- AnyDesk: Remote desktop software with low latency and high-quality display for efficient screen sharing.
Also read: Best Tools To Take Scrolling Screenshots on Mac
Conclusion
This wraps up our guide on how to screen share on Mac for a seamless experience. In conclusion, leveraging screen sharing on your Mac opens up a world of possibilities for seamless collaboration, support, and communication. Whether you’re working on projects with colleagues, assisting friends and family with tech issues, or hosting virtual meetings, the ability to share your screen effortlessly enhances productivity and connectivity.
With native features like Screen Sharing on Mac, you can easily set up and initiate sharing sessions, making it convenient to collaborate with others in real time. Additionally, popular tools like Google Meet, Zoom, Slack, TeamViewer, Microsoft Teams, and AnyDesk offer powerful functionalities to suit various needs and preferences. By incorporating these tools into your daily routine, you can enhance your Mac experience and foster meaningful interactions with others, bridging the distance in this digital age.
So, next time you need to showcase your work, offer a helping hand, or hold a virtual gathering, remember that the world of screen sharing on Mac is just a click away!
 How to Scroll Down on Macbook Pro: Effortless Scrolling
 Best Ways to Lock Your Mac Screen
 Best Ways To Stop MacBook Screen Flickering