Microphone Not Working on Mac? Here’s How to Fix it

Troubleshooting Mac Microphone Issues and Unlocking Crystal Clear Sound!
In this era of virtual communication and remote work, a functional microphone is essential for Mac users who rely on their devices for online meetings, video calls, and voice recordings. However, encountering issues with your Mac’s microphone can be frustrating, especially when it hampers your ability to communicate effectively.
A microphone may not work on a MacBook due to incorrect settings, privacy restrictions, physical connection issues, faulty hardware, outdated drivers, software conflicts, system updates, low audio levels, or a malfunctioning audio port.
Whether you’re experiencing complete microphone failure or poor audio quality, fear not! In this comprehensive guide, we’ll provide you with effective solutions to get your audio back on track.
To be honest, troubleshooting the issue can seem daunting, especially if you’re not tech-savvy. But fret not! We’ve got you covered with a step-by-step guide on how to fix the microphone not working Mac issue to help you diagnose and resolve the problem.
|
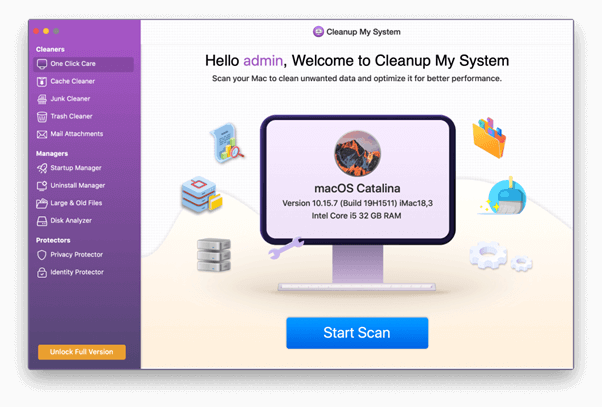
Before we begin… Are you frustrated by the sluggish performance of your Mac? Do you find yourself waiting for applications to load, experiencing frequent freezes, or dealing with a general sense of slowness? If so, you’re not alone. Many Mac users encounter performance issues that can hinder productivity and cause frustration. Fortunately, there’s a solution that can help you fine-tune your Mac’s performance and regain its snappiness. Introducing the Cleanup My System app – a powerful tool designed to optimize your Mac’s performance and enhance its overall efficiency.
With this exceptional tune-up tool at your disposal, achieving optimal performance has never been easier. This nifty app seamlessly identifies and eliminates cluttered junk files, unnecessary mail attachments, outdated and bulky files, and more—all in just a single click. Experience the power of this professional optimization tool as it elevates your Mac’s performance, leaving it running faster and smoother than ever before. |
How to Fix the “Microphone Not Working Mac” Issue?
By following these curated solutions, you can attempt to resolve the microphone issue on your Mac. If further assistance is needed, contacting Apple Support or an authorized service provider is recommended.
Solution 1: Check the Sound Input Settings
To address the microphone not working issue on your Mac, follow these steps:
Step 1: Open the System Setting. You can use various methods to launch Settings such as the Applications folder, Dock, Apple menu, Siri, or Spotlight Search.
Step 2: Once in the System Settings, navigate to the Sound section from the left menu pane.
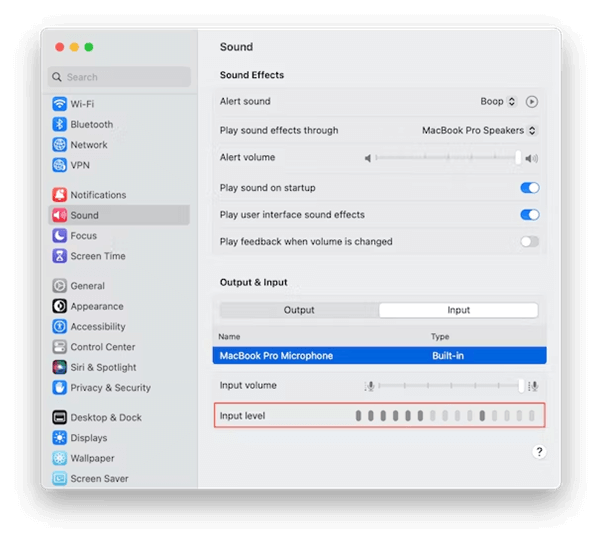
Step 3: Within the Sound settings, switch to the Input tab and select the “Built-in” option.
Step 4: Ensure that the Input volume is set to the maximum level to capture the clearest audio input.
Step 5: Test your microphone by speaking near your Mac, and observe the Input level bars. They should fill up in response to your voice.
If the Input level bars do not fill up or the Internal Microphone option is not available, it indicates that your Mac is not recognizing the microphone as an input source.
By following these steps, you can verify and adjust the necessary settings to troubleshoot the MacBook mic not functioning issue on your Mac. If the problem persists, proceed to explore additional solutions to rectify the problem.
Also read: 15 Best Screen Recording Software For Mac
Solution 2: Review Microphone Permissions
If your microphone is still not working on your Mac, it’s essential to review and ensure that the necessary microphone permissions are granted to the applications you’re using. Here’s how you can check and adjust microphone permissions:
Step 1: Open System Settings by clicking on the Apple menu in the top-left corner of your screen and selecting it from the dropdown menu.
Step 2: In the System Settings window, navigate to the “Privacy & Security” section.
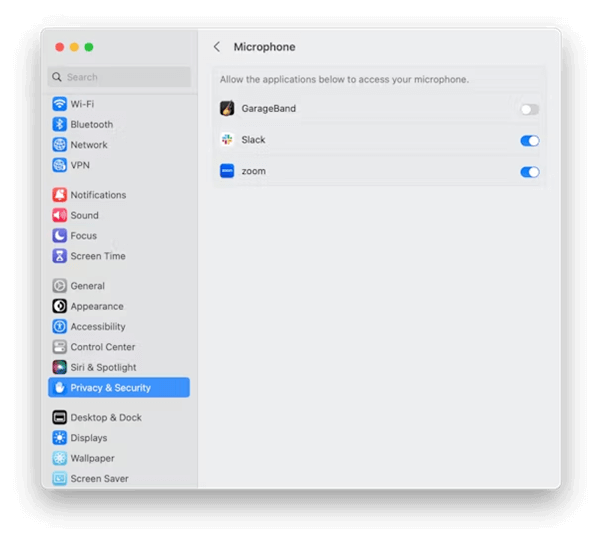
Step 3: Within the Privacy tab, locate and click on “Microphone” from the list of available options.
Step 4: To allow an application to use your microphone, toggle the switch next to the app’s name to the “On” position.
By following these steps, you can easily navigate to the microphone permissions settings on your Mac and grant access to specific applications. After reviewing the app permissions, check if the MacBook mic not working issue was resolved.
Also read: How to Remove Background Noise from Video on Mac
Solution 3: Enable Dictation
If your microphone is still not responding on your Mac, another troubleshooting step you can take is to enable the Dictation feature. Enabling Dictation can help reset certain audio settings and potentially resolve microphone issues.
Follow these steps to enable Dictation:
Step 1: Open “System Preferences” by clicking on the Apple menu in the top-left corner of your screen and selecting it from the dropdown menu.
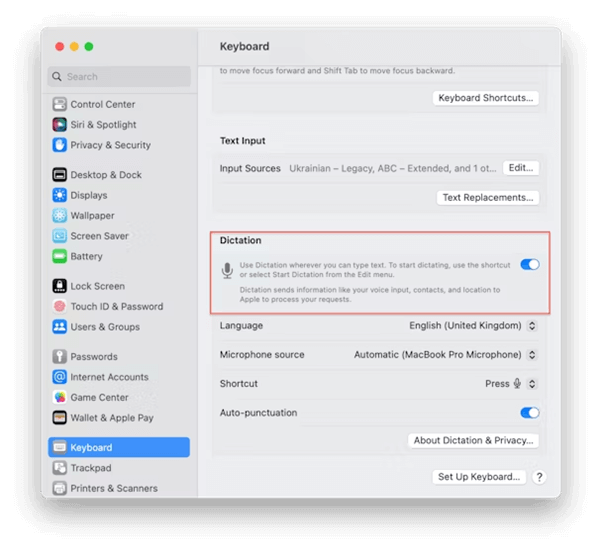
Step 2: In the System Preferences window, locate and click on the “Keyboard” icon.
Step 3: In the Keyboard settings, click on the “Dictation” tab.
Step 4: Toggle the Dictation feature to the “On” position.
Step 5: You may be prompted to download additional files required for Dictation. Follow the on-screen instructions to complete the download.
Step 6: Once Dictation is enabled, click on the “Dictation Source” dropdown menu and select your desired microphone input source.
Enabling the Dictation feature on your device can trigger a refresh of your audio settings, potentially resolving microphone-related issues on your Mac.
Also read: 10 Best Video Recording Software For Mac
Solution 4: Reset NVRAM/PRAM
Resetting the NVRAM (non-volatile random-access memory) or PRAM (parameter random-access memory) can be an effective troubleshooting step to fix MacBook mic not functioning properly on MacBook. Resetting these memory modules can clear certain settings and configurations that might be causing microphone issues.
Follow these steps to reset NVRAM/PRAM:
Step 1: First Shut down your Mac completely.
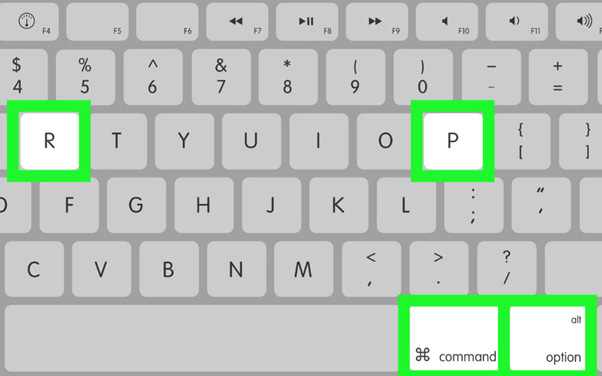
Step 2: Press the power button to turn on your Mac and immediately press and hold the following keys: Option (Alt) + Command + P + R.
Step 3: Keep holding the keys for about 20 seconds until you hear the startup sound for the second time or see the Apple logo appear and disappear twice.
Step 4: Release the keys and let your Mac continue its startup process.
Step 5: Once your Mac has booted up, go to the System Preferences and check if the microphone is now working properly.
Resetting NVRAM/PRAM can help reset various hardware-related settings, including those related to audio and microphone. This can potentially resolve microphone issues on your Mac. If the problem persists, we’ll explore further solutions to address the microphone not working Mac problem.
Were You Able To Fix The Non-Functional Microphone On Your MacBook?
This wraps up our guide on how to fix the microphone not working Mac issue. By following these steps, you can troubleshoot and resolve common microphone problems on your Mac. However, it’s important to remember that each situation may vary, and if the issue persists, it may be necessary to consult with technical support or visit an authorized service provider.
Don’t let a malfunctioning microphone hinder your productivity or communication. Take control of the situation and use the solutions outlined in this guide to get your microphone back on track. Enjoy seamless online meetings, crystal-clear voice recordings, and uninterrupted communication on your Mac once again.
Was this post helpful? Feel free to share your thoughts in the comments section!
 How to Access and Control Mac Remotely For Any Device
 10 Best Music Players for Mac Users in 2024
 How to Fix “Macbook Keyboard not Working” Issue on Mac
 How To Record Mac Screen With Audio