How To Reinstall macOS Without Losing Data?
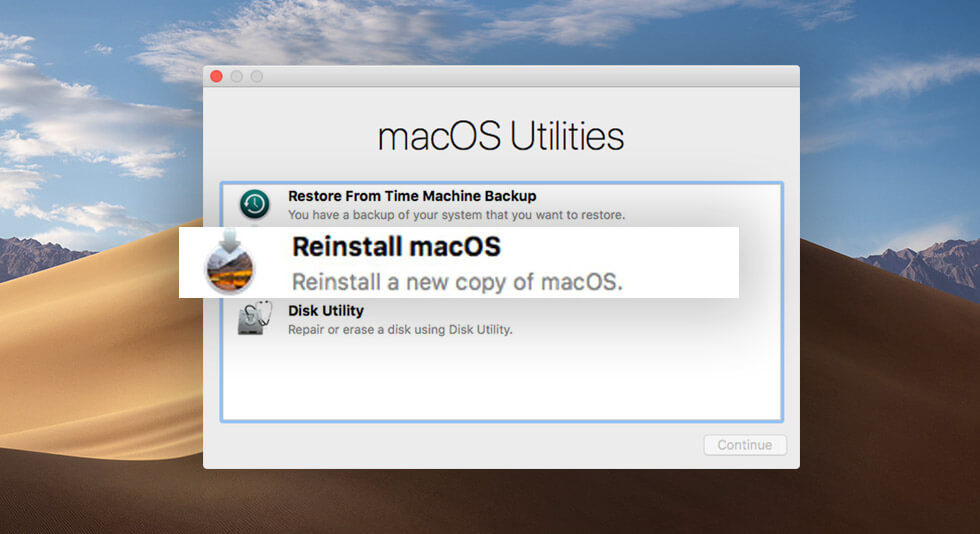
Is your Mac acting up? Have you upgraded your Mac to a new version, and your Mac’s not functioning as smoothly as before? In such scenarios, reinstalling macOS can be a wise move. That said, it might come at the cost of the precious data that resides inside. So, an even wiser question you might ponder is how to reinstall macOS without losing data. An excellent strategy to reinstall macOS without losing data is to back up all files and folders and then reinstall macOS. In that context, this post will touch on the following points –
- Why might you reinstall macOS?
- Ways to backup files and folders before reinstalling macOS?
- How to reinstall macOS
Why Reinstall macOS?
The reasons to reinstall macOS can be many. Let’s look at some of the most common reasons users reinstall macOS.
- Mac’s Acting Up
Maybe your Mac is often swarmed with error messages, or every other application keeps crashing. This certainly is not normal, and a fresh reinstall could help.
- Downgrade macOS
In most cases, when you upgrade your Mac to a new version, the change is pleasant. You get a raft of new features and better performance. But, sometimes (especially when your Mac is older), the experience might not be as you expect, and you might want to downgrade your Mac.
- You’re Planning To Sell Off Your Mac
You have your eyes set on the new MacBook Pro and plan to get it in exchange for your old Mac. Great! But, before you sell it off, consider reinstalling it – Get rid of existing configuration and data so that the new owner doesn’t have access to that.
How To Reinstall macOS Without Losing Data
Step No – 1 – Backup Files
It is quite likely that you might suffer data loss during reinstallation. To prevent this loss, you should take a backup beforehand. Here are some ways to do just that –
1. Backup Files On An External Hard Drive
All you need is a compatible macOS hard drive. Plug the hard drive in. Copy the data from your Mac’s storage and paste it onto your hard drive. This backup copy can be a physical second copy that you won’t lose if something happens to your Mac.
2. Backup Files With The Help Time Machine
Time Machine is your Mac’s in-built utility that can help you back up your data. You will need an external drive to backup data. Let’s give a walkthrough of how to backup files on a Mac using Time Machine.
1. Click on the Apple icon and click on System Preferences.
2. From the System Preferences, select Time Machine.
3. Click on Select Backup Disk.
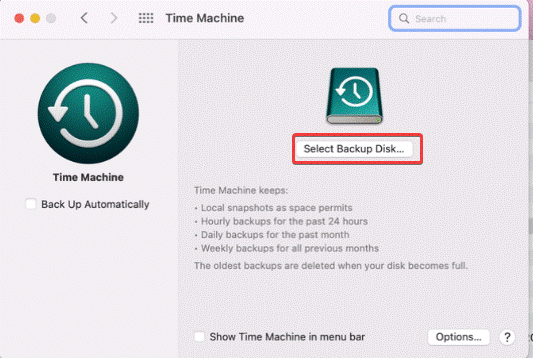
4. Select the hard drive you want to use to back up your files and folders.
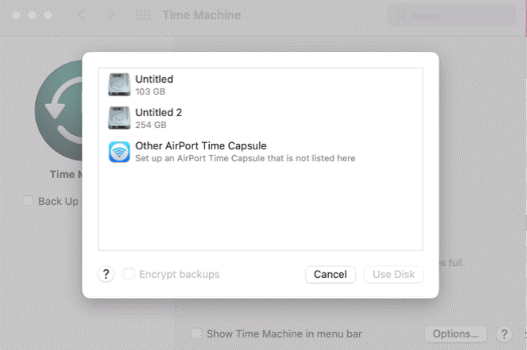
5. Click on Use Disk from the bottom right corner, as shown in the screenshot below.
Learn more about how to create and restore from Time Machine backup on Mac here.
3. Use A Cloud Storage To Backup Data
How about backing up some part of your data on the cloud? If you are wondering why? Then, this data on the cloud can be accessed, let’s say, when you are away from your Mac or when you want to access files from another device. In the context of reinstalling Mac, you can have an additional option to back up your Mac data. You can use iCloud, Apple’s cloud-storage medium, to backup files. Here are the steps –
1. Open System Preferences
2. Launch the iCloud app.
3. Enter your credentials to log in.
4. Click on the checkbox next to the data you intend to back up.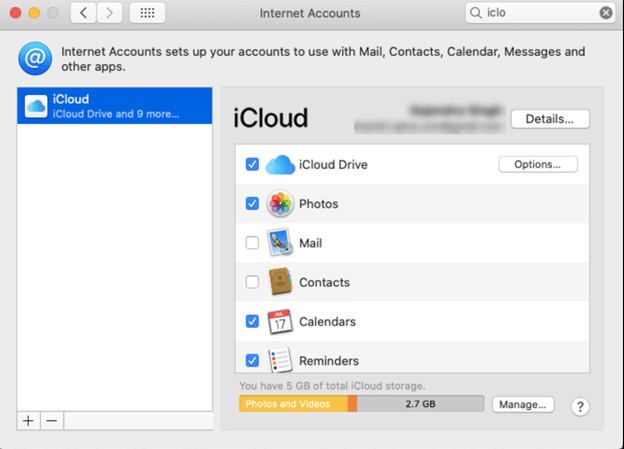
If not iCloud, you can opt for several other cloud storage for mac such as Google Drive, Dropbox, and many others, as mentioned in this blog.
Step No – 2 – Restart Mac In Recovery Mode
So, you have backed up your data. You can boot your Mac in Recovery Mode, as in this mode you can find all disk-related and firmware options. Want to know more about what is Recovery Mode and the function of the various options you get in Recovery Mode? Let’s see how you can restart an Intel-based Mac in Recovery Mode –
1. Click on the Apple icon.
2. Click on Restart.
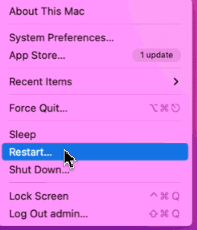
3. When the system is restarting, immediately press the cmd+R key combination until macOS Utilities.
How To Reinstall macOS
If you want to reinstall macOS on a Mac that you want to sell off to someone else or if it’s a Mac that’s infected with malware, consider wiping off all the data. For this, click on the Disk Utility in macOS Utilities, select the drive you want to erase from the left-hand pane, and then click on the Erase tab from the right-hand side. Now head back to the macOS Utilities window and click on Reinstall macOS. Post that, follow the steps mentioned below –
1. Click on Continue.
2. Select the disk on which you want to Install macOS.
3. The reinstallation of your macOS will begin. It is important that you don’t switch off your Mac while the installation process is running.
4. If you want to restore your previous data, you can choose the Time Machine backup we discussed earlier.
How To Recover Data Lost After Reinstallation?
The data you have lost might be overwritten or damaged. In such a case, you can take the help of a data recovery application like EaseUS Data Recovery Wizard for Mac. With the help of this tool, you can check if the lost data can still be tracked or not. The free version lets you recover up to 2 GB of data. And if you are happy, you can invest in the premium version, whose price starts at US$89.95 /month.
How To Recover Lost Data on Mac With EaseUS Data Recovery Wizard?
1. Download, run, and install EaseUS Data Recovery Wizard for Mac.
Click Here to install EaseUS Data Recovery For Mac
2. Select the volume from which you want to recover data.
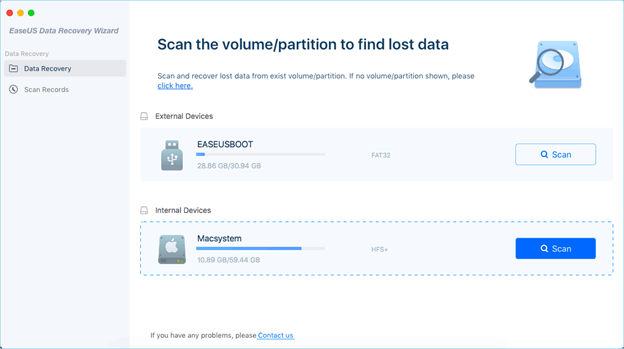
3. Click on the Scan button. The quick scan will first look for deleted files, followed by a deep scan for a more thorough search.
4. Once you have found the file, click on the Recover button.

Wrapping Up
In the end, we’d again like to reinstate that to reinstall macOS without losing data; you should take a prior backup so that even if you lose data, you can restore it later. You must also have an active internet connection while the reinstallation process is going on. And, to further intensify your chances of not losing data, you can always count on a data recovery software like EaseUS Data Recovery Wizard for Mac. Do let us know if you found the information in this post helpful. For more such content, keep reading BestMacTools.

 Mac Won’t Turn On? How to Fix It and Make It Boot
 Best App Uninstaller For Mac In 2024
 How To Uninstall Chromium On Mac