How To Transfer Videos From iPhone To Your Mac: 5 Simple Ways

Our iPhones have become the ultimate partners in preserving life’s most precious moments. At the tap of a button, these remarkable devices capture stunning sunsets, joyful family gatherings, and adrenaline-pumping adventures in unforgettable clarity.
But as our video libraries swell with these cherished memories, keeping them organized can become an overwhelming task. How can we ensure these irreplaceable recordings are safely stored and easily accessible when we want to relive the magic of the moment?
Luckily, transferring these videos from our iPhone to a Mac is a breeze with the right technique. With just a couple of clicks, you can easily transfer your videos from iPhone to Mac. In this article, we have listed a variety of methods to transfer video from iPhone to Mac.
So don’t let those precious moments get lost in a sea of forgotten files. With a few simple tricks, you can transfer your videos to your Mac and keep your memories neatly organized and close at hand. The next time nostalgia comes calling, you’ll be ready to relive the magic.
Also read: How To Recover Deleted Videos On Mac
How to Transfer Video From iPhone to Mac: A Step-by-Step Guide!
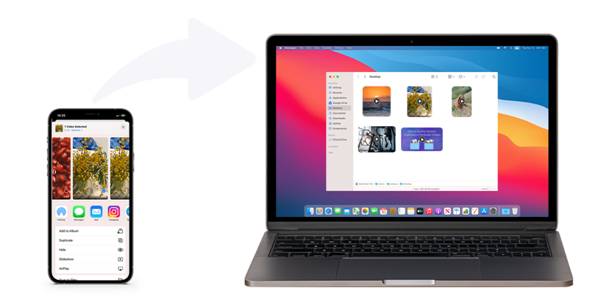
1. Use AirDrop
AirDrop is an Apple feature that allows you to wirelessly transfer files between Apple devices. Here’s how to use AirDrop to transfer videos from iPhone to Mac:
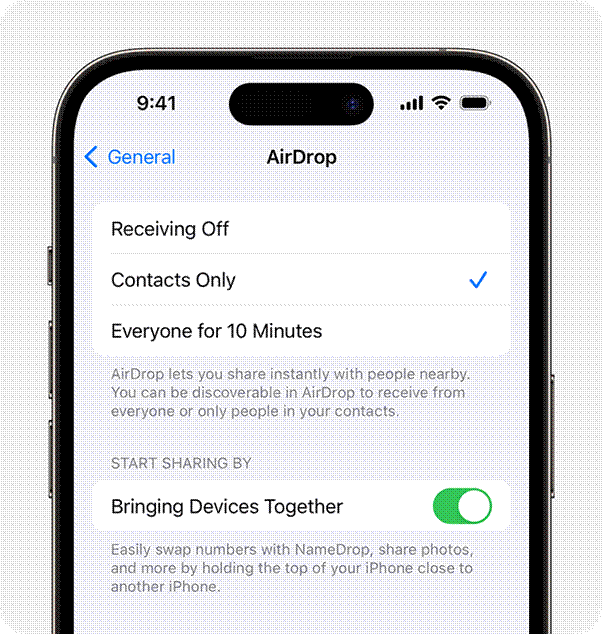
Step1: Make sure both your iPhone and Mac are connected to the same WiFi network. Also, check that Bluetooth is turned on for both devices.
Step 2: Wake your iPhone and swipe up from the bottom to open the Control Center. Tap the AirDrop icon and select “Everyone” to make your device discoverable.
Step3: On your Mac, open Finder and click AirDrop in the sidebar. Your iPhone should appear as a potential recipient.

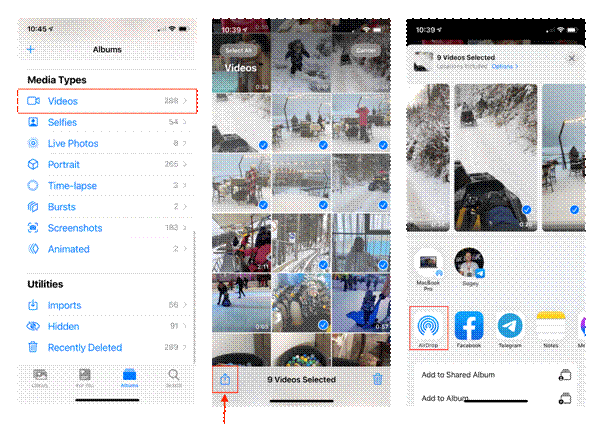
Step 4: On your iPhone, open the Photos app and select the videos you want to transfer. Tap the Share button and select AirDrop. Your Mac should appear, simply click on it to begin transferring the videos.
Step5: Accept the incoming AirDrop transfer request on your Mac. The videos will automatically be saved to your Downloads folder on your Mac.
AirDropping videos from your iPhone is a quick and easy way to get them onto your Mac wirelessly. As long as both devices are close by, you can transfer multiple videos in just a few taps.
Also read: How to Convert MOV to MP4 on Mac
2. Use the Photos App
The Photos app on your Mac provides a direct connection to the photo library on your iPhone when the devices are connected to the same iCloud account. Here’s how to transfer video from iPhone to Mac using the Photos app:
Step 1: Make sure your iPhone and Mac are signed into the same iCloud account. Also, connect your iPhone to your Mac with the charging cable.
Step2: Open the Photos app on your Mac. Click on your iPhone under the Devices heading in the sidebar.

Step 3: Select the videos you want to import from your iPhone’s photo library. Click Import.
Step4: The selected videos will transfer from your iPhone to your Mac’s Photos library. The transfer happens directly without using internet data.
The main benefit of using the Photos app is that it integrates the videos directly into your existing library. This makes it easy to access and edit the videos on your Mac later.
Also read: How To Remove Metadata From Photos on Mac: Protect Your Privacy
3. Use Image Capture
Wondering how to get iPhone videos onto Mac without any hassle? Well, your Mac has built-in software called Image Capture that is designed to grab media files from external devices like cameras. Here’s how it can be used to transfer iPhone videos:
Step 1: Connect your iPhone to your Mac using the USB to Lightning cable.
Step2: Open the Image Capture app on your Mac. It is located in your Applications folder.
Step 3: Select your connected iPhone from the sidebar. Click on each video you want to transfer.

Step4: Click the Import To button at the bottom and select a save location on your Mac, like your Desktop or Documents folder.
And that’s it! The videos will be transferred directly from the iPhone to the selected destination.
Image Capture provides you with more flexibility on where to save the incoming videos on your Mac. It also lets you delete videos from the iPhone after importing if you need to save space.
4. Use iCloud Photo Library
If you have iCloud Photo Library enabled on both devices, you can access your entire iPhone video collection on your Mac through the cloud. Here’s how it works:
Step 1: Go to Settings > Photos on your iPhone and enable iCloud Photo Library. Do the same in the Photos settings on your Mac.
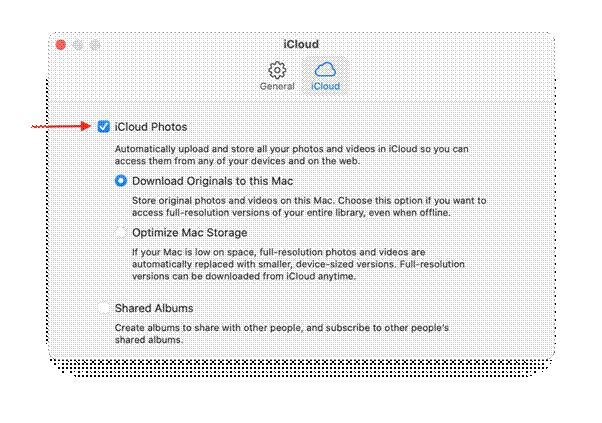
Step2: All photos and videos you take on your iPhone will be uploaded and made available on your Mac automatically via the cloud.
Step 3: Open Photos on your Mac to access all of your iPhone videos. You can download the original files if needed.
The main benefit of using iCloud Photo Library is that both devices stay perfectly in sync. Any edits or deletions made on one device will apply across both your iPhone and Mac.
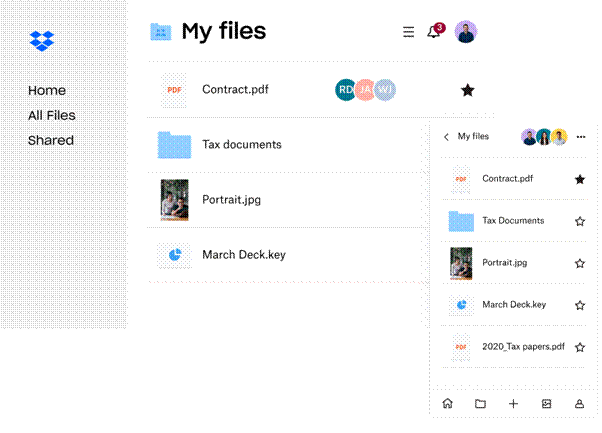
5. Use a Cloud Storage Service
Popular cloud storage services like Dropbox or Google Drive allow you to upload iPhone videos for access across devices. Here’s how:
Step 1: Install the cloud storage app both on your iPhone and Mac. Log into your account on each device.
Step2: In the iPhone app, upload the videos you want to transfer to your cloud storage.
Step 3: Once uploaded, open the cloud storage app or folder on your Mac to access the videos.
If you already use a cloud service like Dropbox, it can be convenient to simply upload iPhone videos for easy access on your Mac. Cloud services also provide ample storage space for large video files.
Also read: Unleash Your Creativity: Movavi Video Editor for Mac Review
Conclusion
In summary, there are several straightforward methods to get videos off your iPhone and onto your Mac. AirDrop provides a quick wireless transfer while the Photos app integrates videos directly into your library. Image Capture gives you more control over file saving while iCloud Photo Library keeps both devices in sync automatically. Popular cloud services like Dropbox also allow you to upload iPhone videos for access on your Mac and across other devices.
Go ahead and use any of these methods to transfer video from iPhone to Mac in just a few clicks.
Don’t forget to tell us which method would you pick to transfer videos from iPhone to Mac? Feel free to share your thoughts in the comments box!
 How to Recover Data from External Hard Drive on Mac?
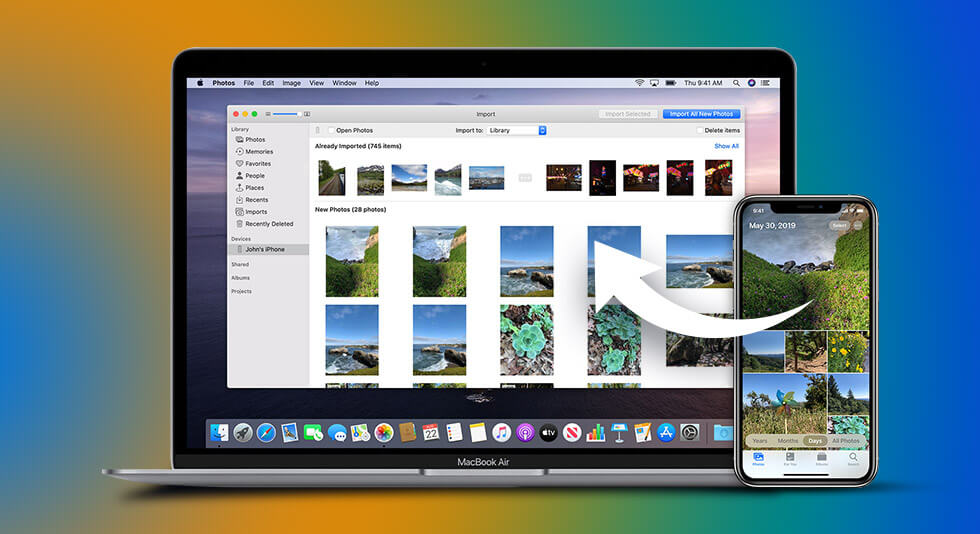 How To Transfer Photos From iPhone to Mac
 How to Delete Duplicate File On Mac