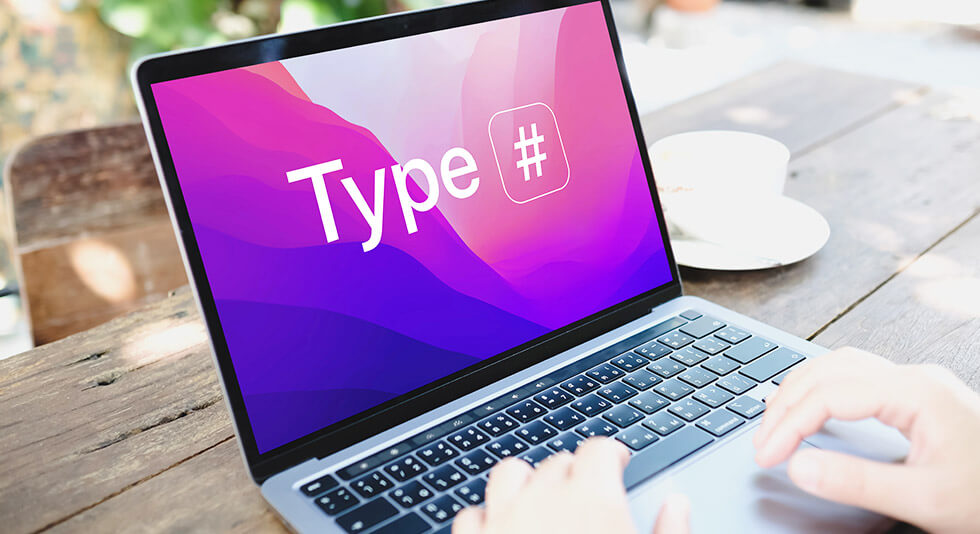
How To Type Hashtag on Mac
Boost Your Social Media Game: Hashtag Typing on Mac Simplified!
In the age of social media, hashtags have become a ubiquitous part of our online communication. Don’t you agree? From trending topics to social activism movements, hashtags have the power to mobilize and unite people across the world. Whether it’s #BlackLivesMatter, #MeToo, or #OOTD, hashtags have acted as a crucial instrument in amplifying voices and creating a platform for discussion and action, more like a viral sensation.

Hashtags have skyrocketed in popularity for several compelling reasons. They serve as powerful organizational tools in the vast sea of social media content. In fact, hashtags have proven to be an effective means of increasing visibility and reach. By using popular or trending hashtags, individuals and businesses can significantly expand their audience and attract new followers.
Also read: How to Take a Screenshot on Mac Step-By-Step Guide
Is the Hashtag Missing on Mac?
But ever wondered how to type hashtags on Mac? Ever noticed that you can’t find the hashtag key on your Mac’s keyboard? Well, fret no more, because we’re here to unravel the mystery and guide you through the art of using hashtags on your Mac. Whether you’re a social media enthusiast or a curious beginner, get ready to unlock the power of hashtags on your Mac keyboard and take your online presence to new heights.
Typically, keyboards don’t feature a specific key dedicated to the hashtag symbol. This is because Mac keyboards are designed with a focus on international compatibility and cater to different language requirements. That’s why , you need to utilize a modifier such as Shift or Option to input the symbol. Confused, right?
Nonetheless, pressing the number 3 alone won’t generate the desired hashtag symbol. So, you might be wondering, how exactly can you create a hashtag on your MacBook?
Let’s dive in!
Also read: How to Fix “Macbook Keyboard not Working” Issue on Mac
How to Type Hashtag on Mac Keyboard?
If you discover that pressing Option + 3 on your Mac produces a £ (pound) symbol instead of the desired # (hashtag), it could indicate that your keyboard settings are configured for the US layout. To revert them to the UK layout and regain access to the hashtag symbol, follow these steps:
1. Tap on the Apple icon placed on the top menu bar and select “System Preferences” and select Keyboard from the available options.
2. Switch to the Input Sources tab.
3. Locate the plus icon (+) and click on it.
4. Choose English> British from the list of input sources.
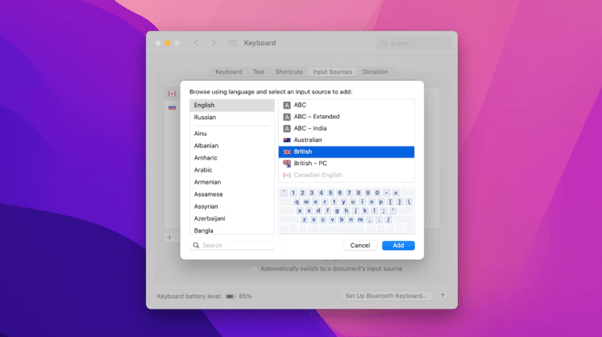
5. Click Add to add the British keyboard input.
6. Also, ensure that the British keyboard input is positioned first in the list of input sources.
By following these steps, you’ll successfully reset your keyboard settings to the UK layout and be able to use the hashtag symbol (#) with ease on your Mac.
Also read: Quick Guide to Copy and Paste on MacBook: Enhancing Your Workflow
How to Create a Custom Keyboard Shortcut?
To create a custom shortcut to use hashtags on the Mac keyboard, follow these steps:
1. Open System Preferences> Keyboard. Now, switch to the “Text” tab.
2. Tap on the “+” icon placed at the bottom.
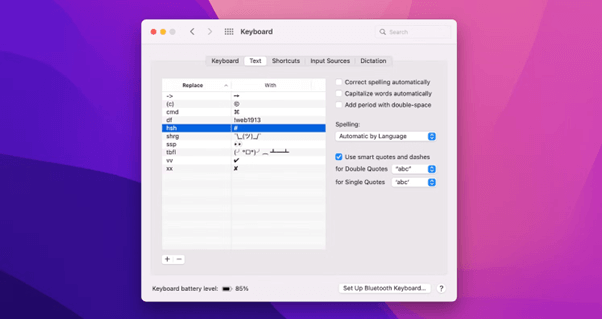
3. Use the “Replace” column in the window to type your preferred shortcut. In the “Next” column add “#” to create a custom shortcut to use the hashtag key on Mac.
Now, each time you press the shortcut key, it will automatically input the hashtag symbol.
Also read: How to Turn on Do Not Disturb on Mac
Create Macros Using the Keysmith App
Keysmith is a remarkable app designed to simplify the process of creating macros for both your Mac and web-based activities. With KeySmith, you can effortlessly automate repetitive tasks and streamline your workflow. Whether it’s automating complex keyboard shortcuts, automating web interactions, or creating personalized automation sequences, KeySmith empowers you to save time and boost productivity. Here’s what you need to do:
Step 1: Download and install the KeySmith app from the Setapp platform onto your Mac.
Step2: Open the KeySmith app on your Mac once it’s installed and ready to use.
Step 3: Click on the “New Macro” button or a similar option within the KeySmith interface to start creating a new macro.
Step4: Begin recording the actions you want to automate by clicking the “Record” button within the KeySmith app. Perform the desired actions on your Mac or within a specific web page.
Step 5: Tap on the “Stop” button within the KeySmith app to end the recording.
Step6: Review the recorded macro.
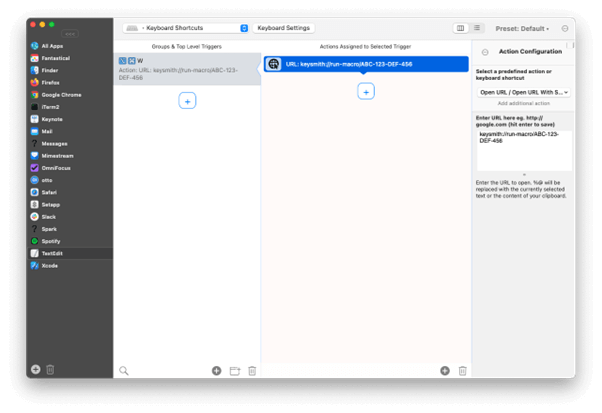
Step 7: Give your macro a descriptive name and save it within KeySmith. Then, assign a trigger to the macro, such as a specific keyboard shortcut or a mouse gesture.
By following these steps, you can create macros using the KeySmith app and streamline your tasks on your Mac and within web-based environments.
Also read: Best Mac Apps In 2023: Must Have Software For Macbook (Free/ Paid)
Mac Users’ Guide to Perfect Hashtag Typing!
This wraps up our comprehensive guide on how to type hashtags on Mac. While Mac keyboards may not have a dedicated key for the hashtag symbol, typing hashtags on a Mac is still easily achievable. By utilizing modifier keys such as Shift or Option in combination with other keys, you can effortlessly generate the hashtag symbol (#).
Understanding the keyboard settings and potentially adjusting them to match your preferred layout, such as switching to the UK layout, ensures a seamless experience when typing hashtags on your Mac.
With a few simple keystrokes and a bit of exploration, you can easily embrace the power of hashtags and fully engage in the vibrant world of social media. So, do you use hashtags while creating your social media posts? Feel free to share your thoughts in the comments section!
 How to Fix Permission Denied on Mac Terminal
 How to Recover Unsaved Word Document on Mac
 Protect Your Mac: Remove Search Marquis with These Simple Steps!
 How To Fix “Your System Has Run Out Of Application Memory” Mac Error