How To Turn Off Auto Brightness On Mac
We’ve all been there – you’re deep into a project on your Mac when suddenly, the screen brightness starts to fluctuate on its own. It’s an all-too-familiar frustration for many users. Auto brightness, while handy in certain situations, can sometimes feel like it has a mind of its own.
Thinking of how to stop Macbook from dimming? Well, if you’re looking to regain control of your Mac’s display settings, you’re in the right place. In this guide, we’ll take you through the straightforward steps of how to turn off auto brightness on Mac. Whether you’re a seasoned Mac user or recently made the switch, these steps will put you back in the driver’s seat, allowing you to fine-tune your screen’s illumination to your preference.
Ready to eliminate those unexpected brightness changes and regain command over your Mac’s display?
Let’s jump in and take control.
Also read: 7 Quick Solutions To Fix Macbook Screen Goes Black But Still Running
Why Turn Off Auto Brightness on a Mac?

The auto-brightness feature uses a light sensor built into your Mac to detect ambient lighting conditions and adjust the screen brightness accordingly. This aims to optimize the viewing experience and battery life.
However, the auto brightness may sometimes make unwanted changes that are disruptive. The screen could dim too much when you’d rather it stay bright. Or it may not be dim enough in very dark conditions.
Manually controlling brightness gives you full control and can prevent problematic automatic changes. Turning off auto-brightness allows you to set the brightness level exactly how you like it.
Also read: How to Use System Preferences Setting on Mac and Boost Your Productivity
How to Turn Off Auto Brightness on Mac
Disabling auto brightness is a quick and straightforward process on any Mac. Here are the steps:
Use System Preferences
Step 1: Click the Apple menu in the top left corner and select “System Preferences”. Or click the System Preferences icon in the Dock.
Step 2: Select “Displays”.
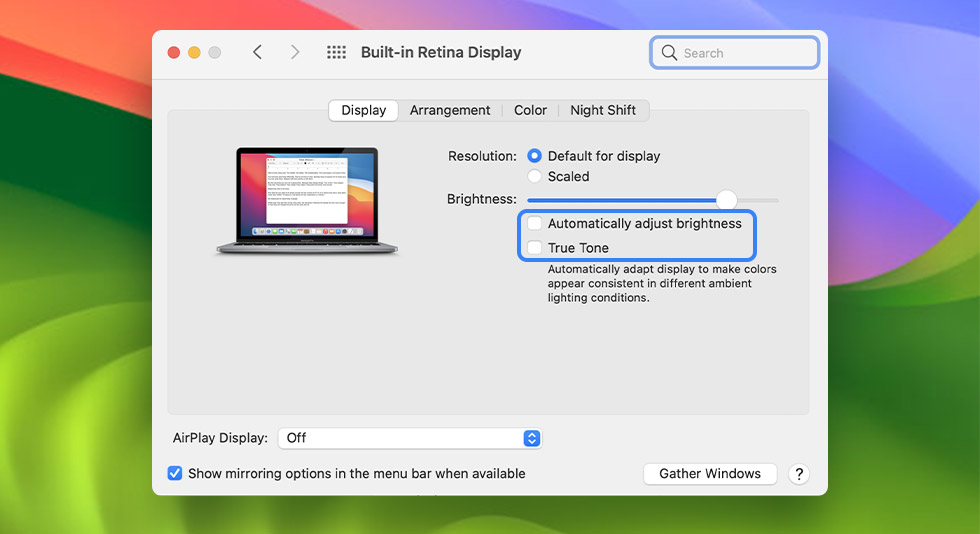
Step 3: Select the “Display” tab. Uncheck the box next to “Automatically adjust brightness”.
With this setting disabled, your display brightness will remain fixed at whatever level you set it to. The light sensor will no longer automatically adjust the brightness for you.
Use Touch Bar Slider (MacBook Pro)
If you have a MacBook Pro with a Touch Bar, here are the steps on how to turn off automatic brightness on Mac:
Step 1: Locate the brightness slider in the Touch Bar.
Step 2: Press and hold the brightness icon. Uncheck “Auto” while continuing to hold. Release after unchecking “Auto”. The brightness level will now stay where you set it manually.
Also read: MacBook Pro Touch Bar Not Working? Here’s How to Fix It
Use Keyboard Shortcuts
Here’s how to turn off auto brightness on Mac using keyboard shortcuts:
Press the keyboard shortcut:
Fn + F1: This decreases the brightness by one level.
Fn + F2: This increases the brightness by one level.
Toggle auto brightness on or off by pressing:
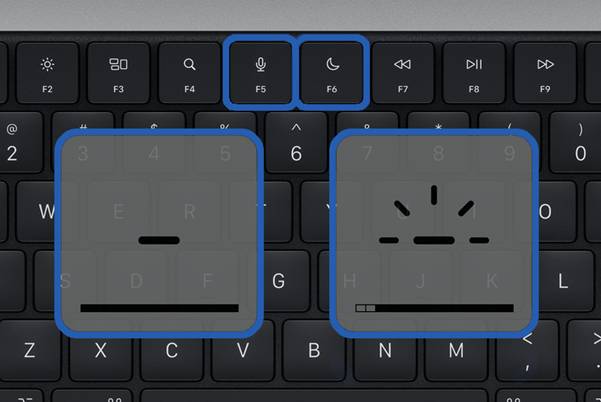
Fn + F5: This turns Auto Brightness on or off.
An indicator light on F5 shows if it’s enabled or disabled.
These keyboard controls provide a quick way to disable auto brightness without opening System Preferences.
Customize Your Preferred Brightness Level
With auto brightness disabled, the brightness level will remain stagnant until you manually change it. Here are some tips for finding your preferred setting:
- Set the brightness to maximum and then gradually reduce it until you find a comfortable level. This gives your eyes time to adjust.
- Consider the lighting conditions where you normally use the Mac. Set the brightness based on your typical environment.
- Test different brightness levels with light text on a dark background versus dark text on a light background.
- Check that text and images are clear at your chosen brightness.
- Consider decreasing brightness when using your Mac in a darkened room at night.
- Try temporarily enabling auto-brightness again to see if it sets the level appropriately. Then disable it once more.
Experiment to find the brightness that provides the best viewing experience for your eyes and needs.
Also read: Best Ways To Stop MacBook Screen Flickering
How to Re-Enable Auto Brightness
If you change your mind later, re-enabling auto brightness is easy:
- Open System Preferences > Displays and check “Automatically adjust brightness”.
- Or use the Touch Bar slider to turn “Auto” back on.
- Or press Fn + F5 on the keyboard to toggle auto brightness on again.
- The brightness will then begin automatically adjusting once more based on ambient light levels.
Considerations for Auto Brightness
Here are some final tips on managing the auto brightness feature:
- Auto brightness works best with newer Mac models that have more advanced light sensors. It may not work as well on some older Macs.
- Make sure nothing is obstructing the light sensor, which is located near the webcam.
- Very bright light sources behind you can confuse the auto brightness readings. Try dimming or moving the light source.
- Auto brightness adjustments happen gradually, so noticeably rapid brightness changes likely mean the ambient light changes.
- You can still manually adjust brightness temporarily even with auto brightness enabled.
Disabling auto brightness gives you full control of one of the most important aspects of your viewing experience. With these steps, you can easily turn off auto brightness and customize the perfect brightness level for your Mac display.
Final Thoughts…
This wraps up our guide on how to turn off auto brightness on Mac. Mastering the art of disabling auto brightness on your Mac empowers you to tailor your display settings to your liking. No more abrupt changes in illumination disrupting your workflow or entertainment.
By following our straightforward guide, you’ve taken a significant step towards a seamless and personalized computing experience. Enjoy the newfound control over your Mac’s display and relish in uninterrupted productivity and entertainment sessions.
Was this post helpful? Feel free to share your thoughts in the comments section!
 How to Increase Download Speed on Mac
 Best Free Lightroom Alternatives for Mac in 2024
 How to Save MacBook Battery Life