How to Uninstall Adobe Creative Cloud on Mac: Step-by-Step Guide

Adobe Creative Cloud stands as a powerhouse, offering a variety of tools and applications that enable artists, designers, and creators to bring their visions to life. From Photoshop’s transformative image manipulation to Illustrator’s vector wizardry, Creative Cloud has become an indispensable companion for countless creative journeys. However, as the winds of change blow and creative needs evolve, there comes a time when parting ways with this software suite becomes necessary. Isn’t it?

If you’ve found yourself on the precipice of bidding Adobe Creative Cloud adieu on your Mac, fear not! Uninstalling software can often seem like a complex task, but this step-by-step guide is here to light your way. Whether you’re streamlining your digital toolkit, seeking a fresh start, or making way for new creative horizons, this guide will navigate you through the process with clarity and ease.
Let’s dive in and begin the journey to uninstall Adobe Creative Cloud on your Mac, one step at a time.
Also read: How To Uninstall Adobe Flash Player on Mac
|
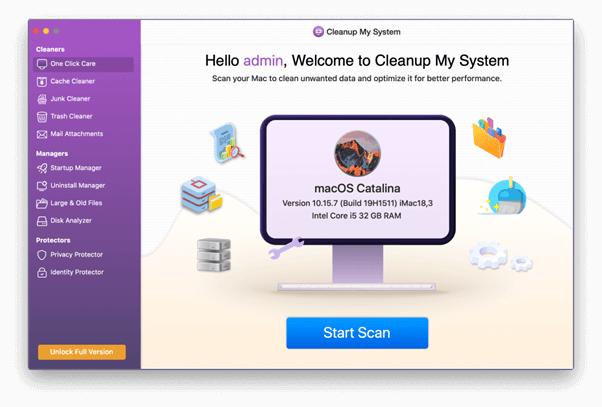
Before we begin… Experiencing the frustration of a Mac that’s dragging its feet? Look no further than Cleanup My System, a creation by Systweak Software that offers the ultimate solution for turbocharging your Mac’s speed. This advanced tuneup utility streamlines the process of locating and eradicating clutter like junk files, unneeded mail attachments, and bulky and outdated files, all with a single click.
When it comes to overseeing your installed software and eliminating undesirable applications seamlessly, Cleanup My System introduces a brilliantly crafted Uninstaller. This tool empowers you to effortlessly bid farewell to troublesome apps while ensuring their associated files vanish completely, leaving behind no lingering remnants. Running out of space on your startup disk and seeing that “Almost Full” warning, finding and freeing up a room can be tough, especially with lots of files? Cleanup My System’s Large Files tool makes it easy by helping you discover and delete big, old files that are taking up unnecessary space. Download today! |

How to Uninstall Adobe Creative Cloud Mac? (Manually)
Follow this comprehensive guide to uninstall Creative Cloud on Mac in just a few simple steps:
Part 1: Force Quit the Application
To initiate the uninstallation process, you’ll first need to close Adobe Creative Cloud and halt any related operations. Follow these steps:
Step 1: Navigate to your Applications folder. You can easily access this by clicking on the Finder icon in your Dock and then selecting “Applications” from the sidebar.
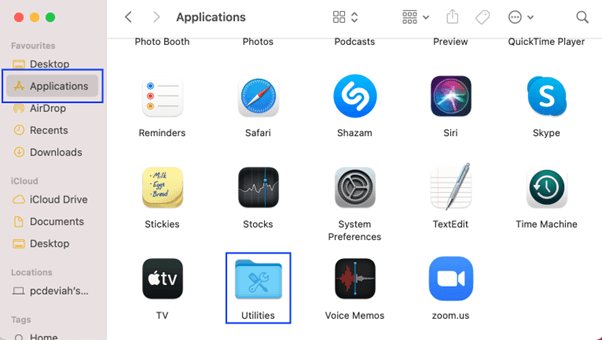
Step 2: Within the Applications folder, locate the “Utilities” subfolder. Open it to reveal a list of system utilities.
Step3: Look for and launch the “Activity Monitor” application. You can also swiftly access Activity Monitor by utilizing Spotlight (pressing Command + Space and typing “Activity Monitor”).
Step 4: Once Activity Monitor is open, employ its search function – usually located in the top-right corner – to look for any processes linked to Creative Cloud. These processes may carry names like “Adobe Creative Cloud,” “Creative Cloud Helper,” or similar.
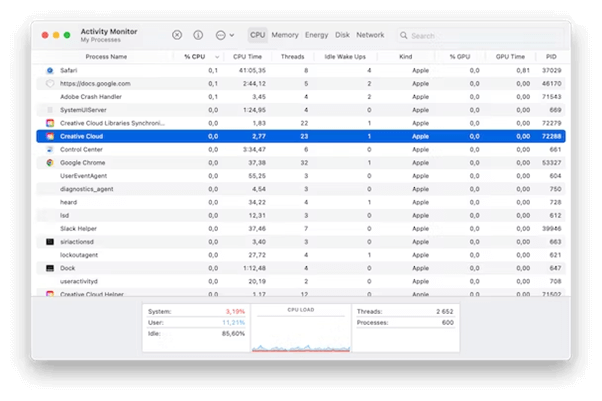
Step 5: For each relevant process, select it and then click on the “X” button located at the top-left corner of the Activity Monitor window. This action will terminate the process.
By ensuring that Adobe CC and its associated processes are successfully closed, you’ll be primed for the next steps of the uninstallation procedure.
Also read: Top 10 Adobe Acrobat Alternative for Mac
Part 2: Uninstall Creative Cloud on Mac
Here comes the next part of our post on how to Uninstall Adobe Creative Cloud Mac:
Step 1: Launch the Adobe Creative Cloud application.
Step2: Navigate to the “App” section and locate the list of applications currently installed on your Mac.
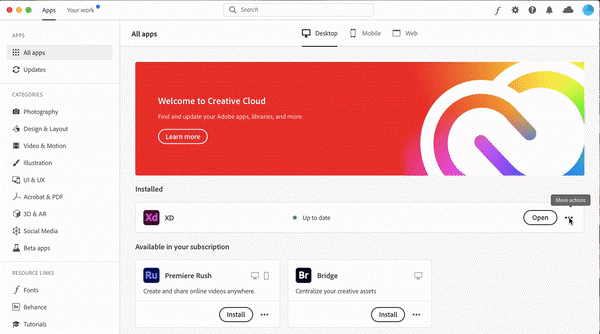
Step 3: Identify the specific app you wish to remove and click on the additional actions icon (often depicted as three dots or lines) adjacent to it.
Step 4: From the resulting menu, opt for the “Uninstall” feature.
Adhere to the instructions provided on the screen to carry out the uninstallation process smoothly.
Also read: Best Ways To Organize Photos on Mac : Streamline Your Mac’s Photo Library
Part 3: Use the Creative Cloud Uninstaller
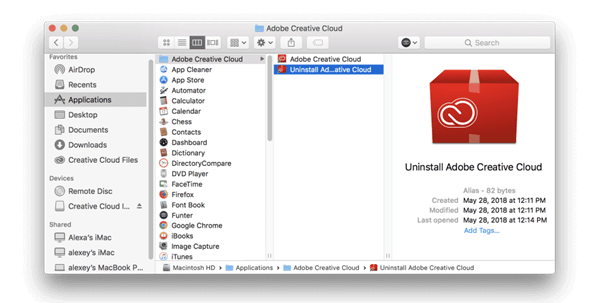
Step 1: Navigate to the “Applications” folder and locate “Adobe Creative Cloud.”
Step2: Access the Creative Cloud Uninstaller and, if prompted, input your administrative password before clicking the OK button.
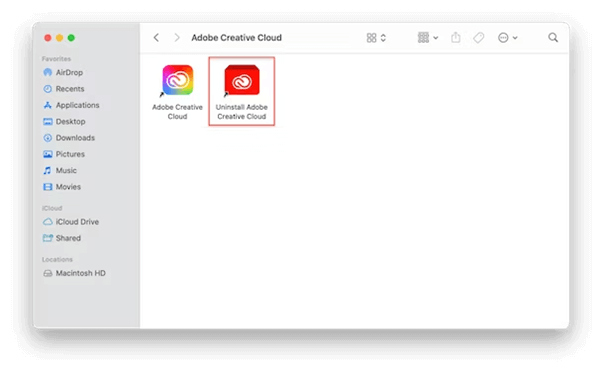
Step 3: Initiate the uninstallation process by selecting the Uninstall option.
Step4: Once a confirmation message pops up, click Close to finalize the process. And that’s it! Your uninstallation task is complete!
Part 4: Remove the Leftover Files
Lastly, it’s crucial to eliminate any lingering remnants of Adobe CC. However, the challenge lies in the fact that the specialized Adobe tool might not entirely erase all remnants of the application from your Mac. Certain components could potentially remain concealed within your system’s directories. To locate and dispose of these remnants, follow these quick steps:
Step 1: Choose “Go to Folder” from the “Go” menu located within the Finder.
Step2: Paste ~/Library into the displayed field and press the Go button.
Step 3: Scan for any files related to Adobe within the folder and delete them.
Step4: Follow the same procedure in steps 2 and 3 for the subsequent locations:
~/Library/Application Support
~/Library/Preferences
/Library/LaunchAgents
/Library/LaunchDaemons
/Library/PrivilegedHelperTools
After tidying up the system directories, finalize the uninstallation process by emptying the Trash. With this step complete, Adobe CC should now be entirely eradicated from your system.
Also read: How to Reduce PDF File Size on Mac
How To Uninstall Adobe Creative Cloud Mac Using Cleanup My System Tool?
With the assistance of the Cleanup My System tool, the uninstallation process becomes a breeze. Let’s walk through the steps to ensure a seamless removal of Adobe Creative Cloud from your Mac system:
Step 1: Begin by downloading and installing the Cleanup My System tool if you haven’t already. You can acquire the tool from the official website and follow the installation prompts.
Get Cleanup My System
Step 2: After installation, launch Cleanup My System by locating it in your Applications folder or using Spotlight search.
Step 3: Within Cleanup My System, navigate to the Uninstall Manager feature. This is where you’ll find the necessary tools to remove Adobe Creative Cloud.
Step 4: In the Uninstall Manager, identify Adobe Creative Cloud from the list of installed applications on your Mac.
Step 5: Click on Adobe Creative Cloud to select it. Look for the “Uninstall” or “Remove” option (the exact wording may vary). Confirm your choice to uninstall Adobe Creative Cloud when prompted.
Step 6: Cleanup My System will take charge of the uninstallation process. It will meticulously remove Adobe Creative Cloud and associated files from your Mac.
Step 7: If you wish to perform a more thorough cleanup, explore Cleanup My System’s additional features, such as removing leftover files and optimizing your system for optimal performance.
Step 8: Once Cleanup My System completes its tasks, you’ll receive a confirmation that Adobe Creative Cloud has been successfully uninstalled.
For the changes to take effect and ensure a clean system, consider restarting your Mac. So yes, you’ve successfully uninstalled Adobe Creative Cloud from your Mac using the Cleanup My System tool.
Conclusion
In wrapping up this comprehensive guide on how to Uninstall Adobe Creative Cloud Mac, we hope you’ve gained a powerful set of tools and insights. By meticulously following each step of the process, you’ve taken control of your digital environment, freeing up space and enhancing your Mac’s performance. With a firm grasp on navigating system folders, utilizing dedicated uninstallers, and leveraging Cleanup My System, you can easily perform the uninstallation process.
With your Mac now unburdened, go forth and use your device with renewed productivity and creativity.
Was this post helpful? Feel free to share your thoughts in the comments section!
 Best Procreate Alternative for Mac That Will Help You Pursue Your Sketching Passion
 Best Free Lightroom Alternatives for Mac in 2024
 How To Fix “Photoshop Scratch Disk Full Mac” On Mac
 Best Photoshop Alternatives for Mac 2024